
Updated November 1st, 2022.
Your Mac has zillions of files on it. And even if you save all of them to the Desktop (or, especially if you save all of them to the Desktop) it can still be hard to find the file you want. Fortunately, built into the Mac is something called “Smart Folders” and once you know how they work, they’ll save you gobs of time every day.
BONUS: Smart Folders aren’t a Finder-only thing. Other apps with Smart Folders include iTunes, Music, Photos, Contacts, and Mail. Learn how Smart Folders work here and apply that knowledge all over the place!
First, let’s describe some common scenarios where one is trying to locate certain kinds of files:
- You’re looking for a Word document that you know you worked on sometime in the last two weeks, but you don’t know where it’s gone to.
- You’re looking for hi-res images in any graphics format and you know you’ve filed them in various folders but you don’t want to open up each folder to search by eye.
- You’re looking for all movies files more than a minute long
As usual on a Mac, there’s more than one way to do these things, and also as usual on a Mac, some ways are easier than others. I’m here to show you the easiest way. The easiest way is called “Smart Folders.”
Smart Folders are saved searches. OK, what does that mean? I’ll explain it this way: imagine you have a real-life filing cabinet, and in it are all sorts of documents. Maybe you’ve organized them by year, with folders and dividers organizing them further into Medical, Auto, Banking, Insurance, Home Improvement, etc. Now imagine that you want to look at every document in the filing cabinet that has to do with Auto, for any year. In real life you would have to open up each year’s Auto folder, and then you’d have to pull out the documents, and then when you were done you’d have to remember where each one came from and then put every document back where it came from.
That’s hard.
But what if you could put your hand into a magic glove, and then reach into the filing cabinet and have every document that had anything to do with Auto somehow jump to your hand as if by static electricity? That would be pretty cool. And what if, when you were done, the documents all went back to where they belonged– that is, they went back to whatever folder they came from? That would be pretty cool also.
And what if you had another magic glove, maybe a different color, and when you put that one on it attracted every document having to do with Medical or Insurance? That would be cool again. You get the idea. We want this.
Cool or not, magic gloves have not been invented. Smart Folders are almost the same thing, though, and they are here today. You’ll use Smart Folders to find things that you need over and over: all the Word docs from the past two weeks, all the big graphics documents, all of the videos longer than a certain length. And they’ll be right there in the Finder’s Sidebar, as one-click shortcuts that are always up to date (because they’re “saved searches” and when you click them, they do the search right then and there).
Here are three examples. Once you see how Smart Folders work you’ll be able to easily make your own. Hopefully, these examples will serve as inspirations and starting points.
How to make a Smart Folder that shows every Word document you’ve opened in the last two weeks
You have thousands of files, some properly organized, maybe some not, and somewhere on your Mac is that one Word document (you forgot the name) that you worked on either this week or last week and really need right now. A Smart Folder that shows you every Word document you’ve opened in the last two weeks is just the ticket. Here’s how you make one.
First, in the Finder, go to the File menu and choose “New Smart Folder.”

Choosing “New Smart Folder” produces a box with a whole lot of nothing in it. We’ll use this box to tell the Mac what we want our Smart Folder to do.

See the little “+” at the upper right, near the Save button? Click that. Now we’re getting somewhere.

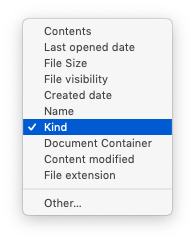
I’ve chosen “Kind is Document” because I am only looking for Word documents. However, there are many, many options under “Kind” and many under “Document” as well. Here’s what you see if you click “Kind.”
(We’ll get into what “Other…” leads to later.)
Clicking on “Document” in the other menu shows you the kinds of things you could look for.

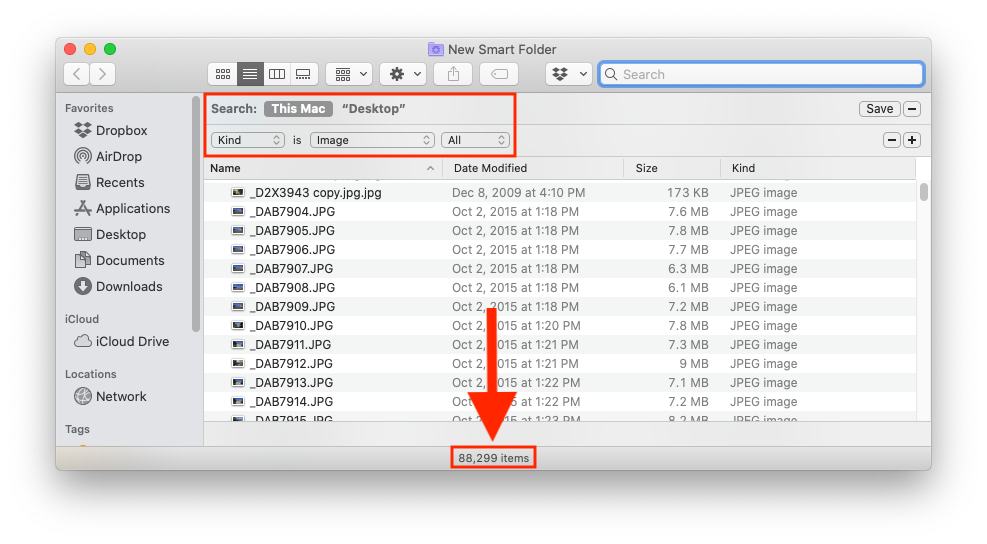
The result of choosing “Kind is Document” is a list with a LOT of documents (over 34,000 in this example).

Let’s narrow things down. We only want Word documents, not PNG, not HTML, not PDF, not PSD, etc. Just Word. We know that Word documents have “.docx” (the so-called “extension”) at the end of their names, so let’s add “must have .docx at the end of the file name” as a criterion. We start by clicking the little “+” at upper right. Then we use the menus to make it say “Name ends with .docx.”

We’ve narrowed down our search from 34,155 to 123. Now let’s add in the “Must have been opened in the last two weeks” criterion. Click the “+” again and use the menus to make it say “Last opened date is within last 2 weeks.”

So far, this looks a lot like doing a “Find” (because that’s what it is). But there’s one more step, which essential saves the Find, letting us get– someday in the future– the CURRENT list of Word documents that have been opened within the last two weeks, with a single click. Look for the Save button at upper right and click it.

Give your Smart Folder a good name (“Word Docs from last 2 weeks” maybe?), leave the “Where” as is (that is save your new Smart Folder in the Saved Searches folder, and leave the “Add to Sidebar” checkbox checked. The result is shown below.

(Smart Folders have a gear icon in the Sidebar, and a purple folder icon in the Title Bar. If it were up to me they would have the same icon in both places but Apple apparently didn’t know how to reach me when choosing the icons. Next time!)
You’ve made a Smart Folder. Now what? Well, now you go about your regular work, and then one day you think “Gee I’d like to see all of the Word documents I’ve opened in the last two weeks.” That’s when you will click on your Smart Folder in the Sidebar, and instantly you’ll see all of the Word documents from the past two weeks, no matter where they are, no matter how many there are. And remember, even though the Smart Folder shows all of the matching items in one place, the documents aren’t “moved.” They’re still wherever you put them.
As mentioned above, Smart Folders are “saved searches.” You won’t make a lot of them, and only you can tell which ones you should make. Give it some thought and make one or two. The effort you put in could pay off over and over.
Here’s another example.
How to make a Smart Folder that shows images with height and width both more than 1000 pixels
If you have a lot of images on your Mac (who doesn’t?) you’ll appreciate having a Smart Folder showing images with height and width greater than 1000 pixels. In this example I’ll show you additional options for Smart Folders, which we will put to good use.
Let’s make a new Smart Folder. Do what you did before: in the Finder, go to File/New Smart Folder. This time, choose “Kind is Image.”
Notice that you can specify a particular type of image: JPEG, PNG, TIFF, etc. or choose to show all of them. In our example, I’m going to stick with “All.”

Now we’ll narrow things down. I want to find images that are fairly big: at least 1000 pixels high and at least 1000 pixels wide. I promised you new stuff in this example and here it comes: click the “+” to add criteria and this time, rather than choosing “Kind” or “Last opened date” or anything else we are going to choose “Other…” Just look at the options that gives!
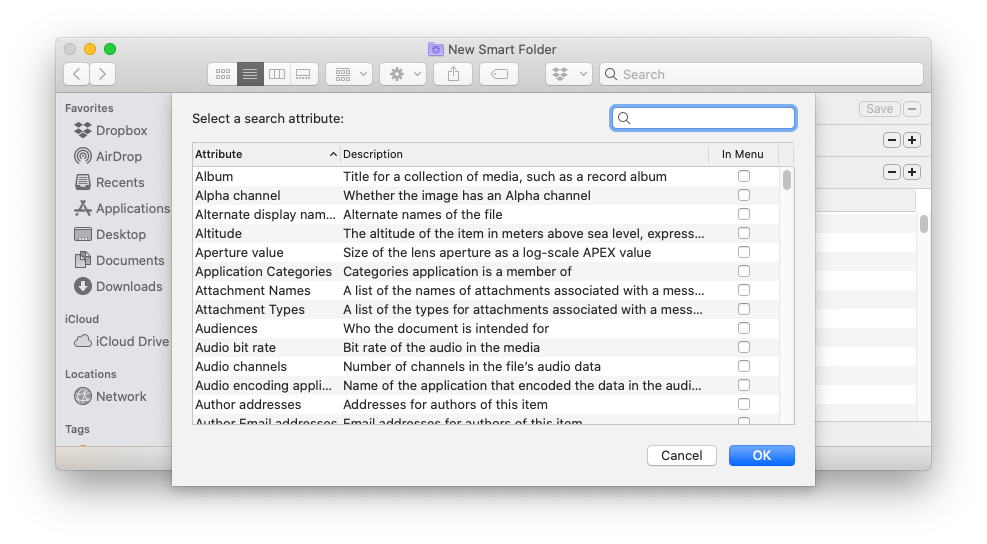
There are so many options that you might want to search for something rather than scroll. Here I’ve searched for “pixel” hoping I’d find what I was looking for (I did).
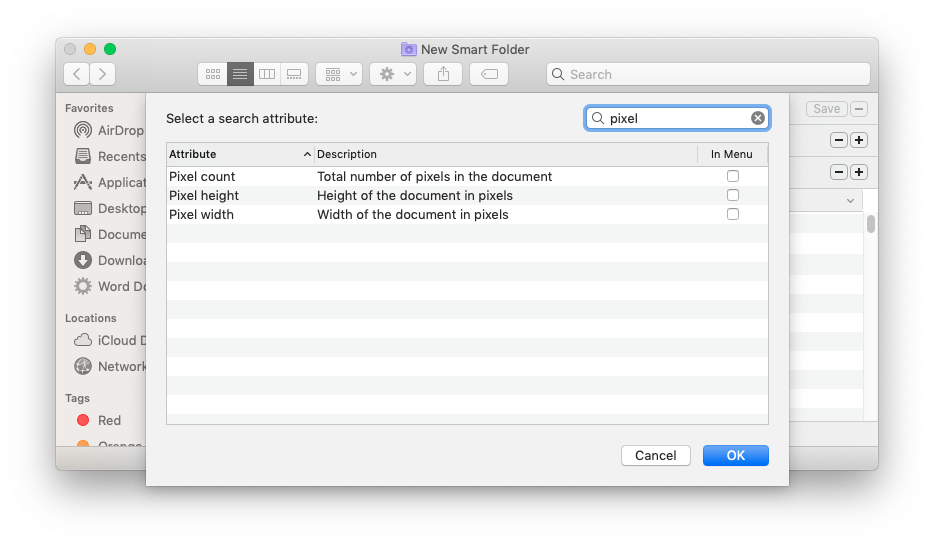
Tip: if you think you’ll be using “Pixel height” and “Pixel width” as search criteria in other Smart Folders you should check the box under the heading “In Menu.” That way, you can choose those items without going to “Other…” as they will be in the original menu, where “Kind” is.
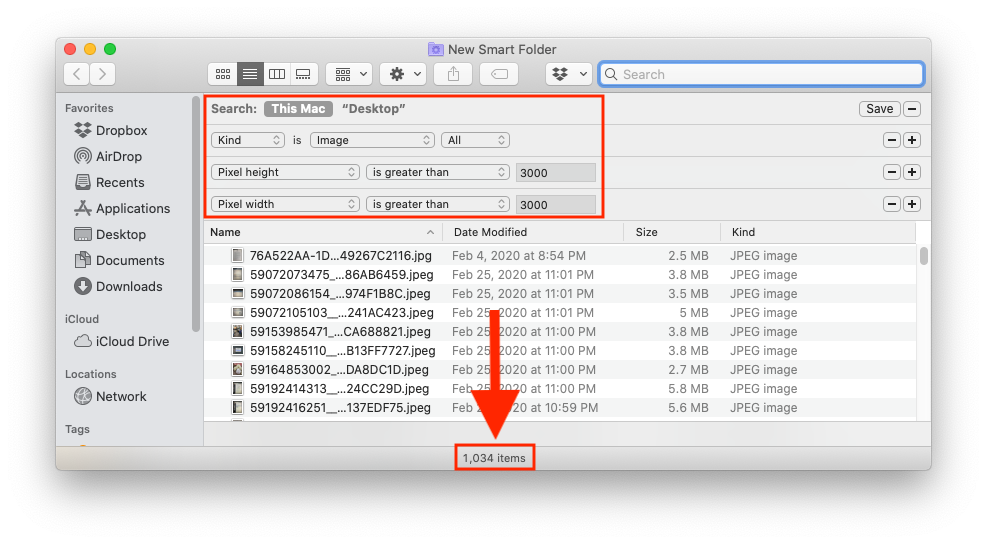
Here’s how my Smart Folder looks after specifying “Height is greater than 1000 pixels”…
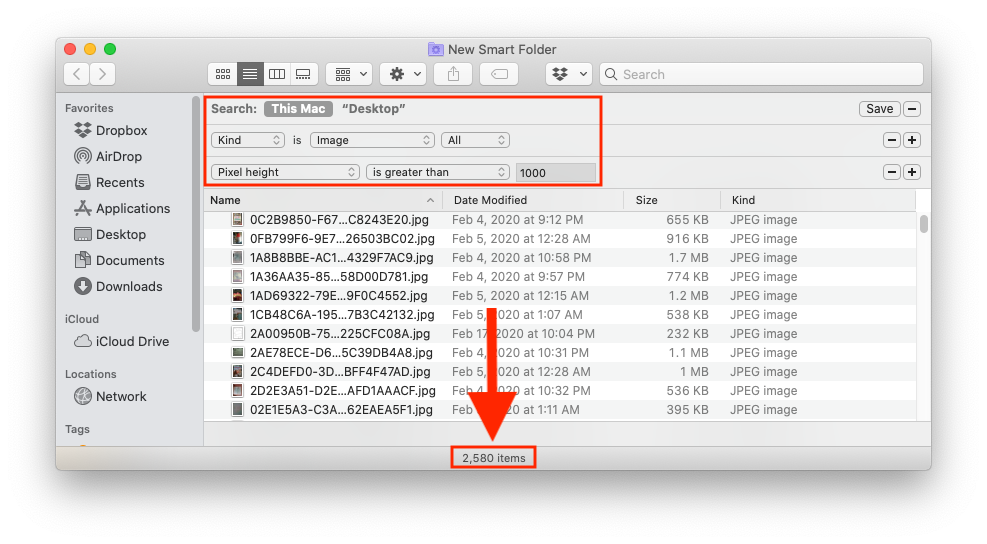
Adding the “Pixel width is greater than 1000 pixels” leads to this:

Just for fun let’s adjust the settings and see if we can filter things down a little bit more:
As before, we’d click “Save” at upper right, and save this Smart Folder. From then on, anytime I was looking for my biggish images, all I’d have to do is click on the Smart Folder.
Let’s do one more.
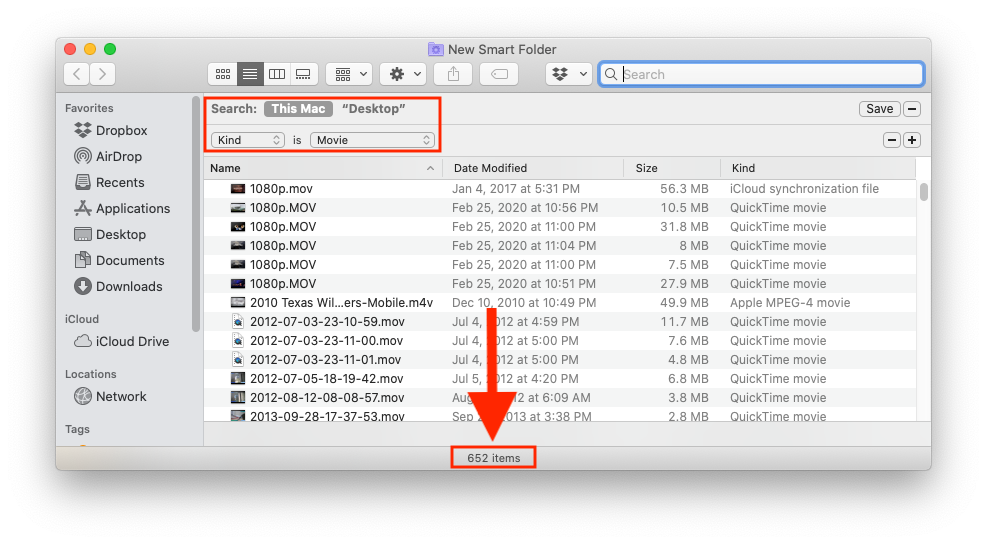
How to make a Smart Folder that shows movie files for movies that are more than 60 seconds long
Now that you know how to choose “Other…” and then find new criteria it should not be hard for you do this one. Here’s how my New Smart Folder looked when I specified “Kind is Movie”:

And that’s it. Three Smart Folder examples. Hopefully one of the examples will make you say “Aha! I want that!”
How to edit your Smart Folders
Smart Folders aren’t like regular folders. In fact, they probably shouldn’t be named Smart Folders because the word “folder” implies that you can drag things into them. Which you can’t. But, what you can do is edit a Smart Folder’s saved criteria. There are a couple of ways to do it but the easiest way is to hold the Control key down and click on the Smart Folder in the Sidebar. You’ll get a contextual menu with an option to “Show Search Criteria.” Choose that, and you’ll be back on familiar turf, viewing the same dialog box that you used when you set up the Smart Folder to begin with.
Here’s the contextual menu you’ll get when you hold the Control key down and click on a Smart Folder.

Give Smart Folders a try. And remember, what you’ve learned here can also be used in iTunes, the Music app, Photos, and Mail, as they have Smart Folders too, and they work exactly the same way there as they do in the Finder.
Copyright 2008-2024 Christian Boyce. All rights reserved.Did this article help you?
Maybe you'd like to contribute to theChristian Boyce coffee fund.

Want some some quick iPhone how-tos?
Visit me at iPhoneinaminute.com.
Looking for quick tips about Macs?
See my One-Minute Macman website!

How to create a keyboard shortcut to open a specific folder on my desktop
while in Firefox or Word or anywhere else in my Mac? Thanks!
Hi JD. tell me more about what you’re trying to do here. Are you trying to bring the Finder to the front and to open a particular folder? Or, are you trying to save a document and trying to bring a particular folder to the foreground so you can save something into it?
Looking to just do a simple (2 or 3 keys) keyboard combination and have that open a particular folder or document no matter if its on the desktop or embedded in another folder.
Thanks!
I think I’d buy Keyboard Maestro. Here’s the link. https://www.keyboardmaestro.com/main/. You can do so much with it, including what you’re asking for. $36.