
Updated November 1st, 2022.
You can do great stuff with a Mac right out of the box. But if you want to do more stuff, and do it faster, more efficiently, and more easily, do these ten things. It takes just a few minutes and you’ll be paid back every day, many times over.
I set up a lot of Macs and when I do, I always run down this list. That’s with new Macs. But it’s never too late for you to do these things now!
1. Turn on the scroll bars.
Scroll bars are good! They show you how much more content there is. Look at these screenshots, one with the scroll bar showing, the other without (click the image to see it larger):
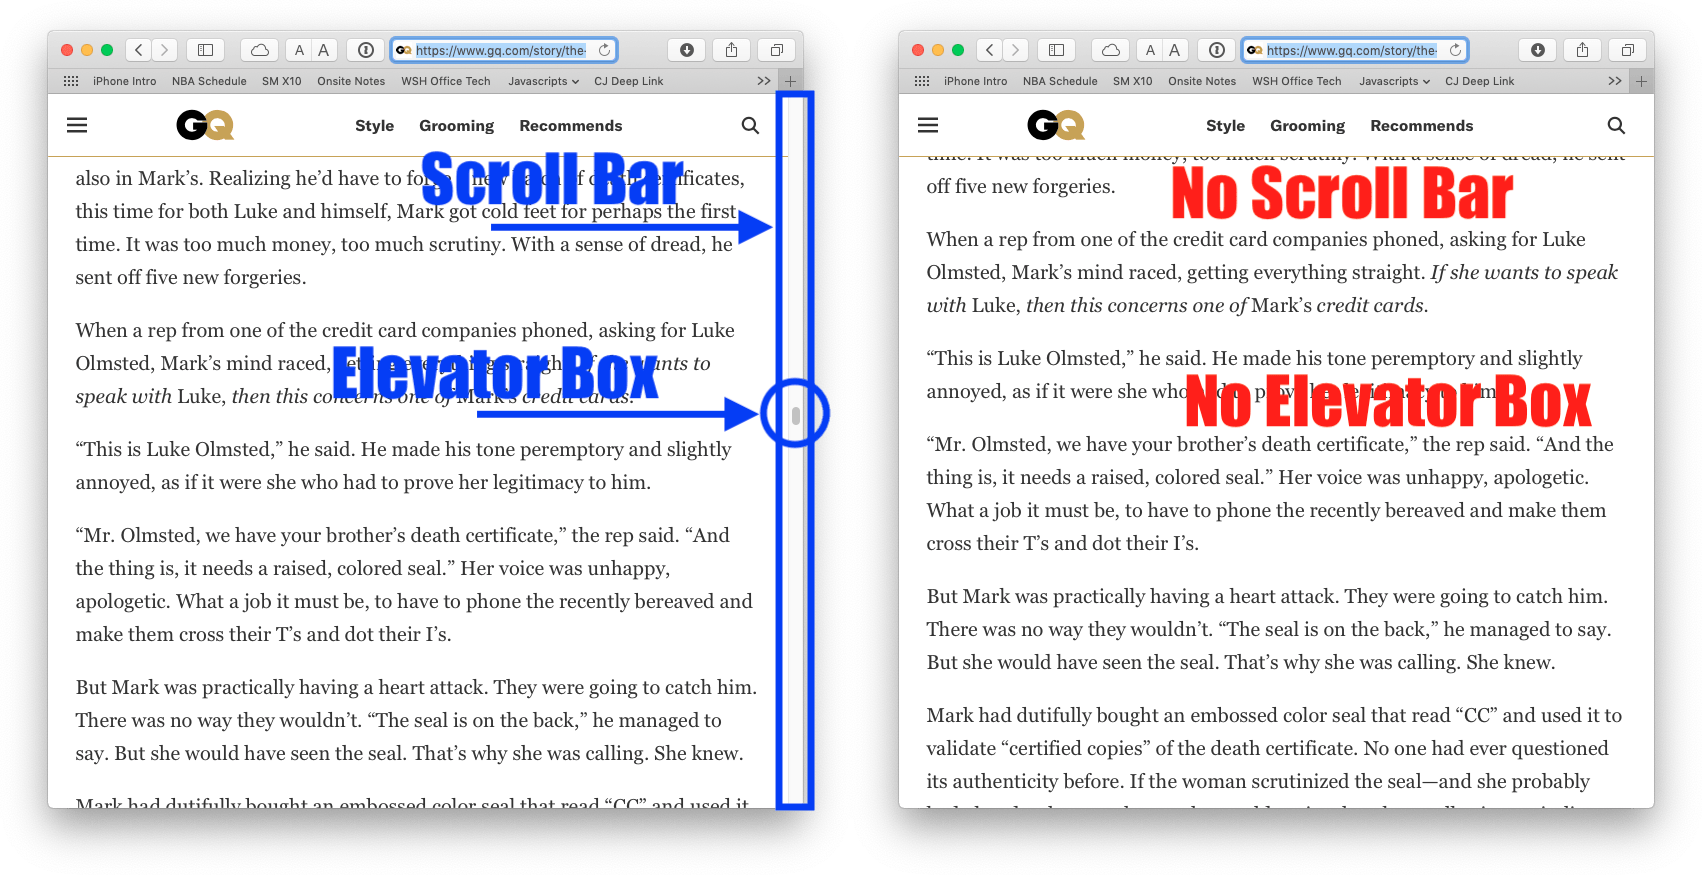
In the picture on the left, with the scroll bar showing, you can tell at a glanc, that we are halfway through reading the article. The small size of the elevator box within the scroll bar indicates that we are seeing only a very small bit of the article– it’s clearly a long one. (A bigger elevator box indicates we are seeing a larger percentage of the content.) You can’t tell any of this stuff by looking at the picture on the right, the one without scroll bars.
Apple turns the scroll bars off, by default. You should turn them back on. Apple menu/System Preferences/General/Show scroll bars: Always.

2. Turn off Handoff
Handoff is a feature that solves a problem nobody has. What it does is, it lets you start writing an email (or a text message) on your iPhone (or iPad), and then finish writing it on your Mac. (You can also go in the reverse direction– that is, start on the Mac, finish on the iPhone or iPad.) If you’ve ever seen an icon like the one shown below at the front end of your Mac’s Dock, that’s Handoff, and the idea is you would click that icon to finish whatever job your iPhone (or iPad) was doing at that time.

In my experience, I have never seen someone use Handoff. Never! I have seen people annoyed by Handoff’s icon jumping into view, then disappearing, then re-appearing, etc. Distraction is bad. Turn Handoff off. (Of course, if the idea sounds good to you, leave it on, and use it!) Apple menu/System Preferences/General/Allow Handoff between this Mac and your iCloud devices (OFF)

3. Increase the number of Recent Items
The Mac does a great job keeping track of documents and apps that you’ve recently used, a far better job than Word and Excel and Photoshop do. I’m hoping you’re already using Recent Items (under the Apple Menu), and now we’re going to make it even better by telling the Mac to track more items. The default is ten: 10 documents, 10 servers, 10 apps. Change it to 20 (or more). Yes, you have to find a balance between the convenience of finding something in the Recent Items menu and the inconvenience of having a really long menu to scroll through, but for me, I lean toward the convenience of finding what I’m looking for. Pick a big number and see how it goes. Prediction: you’ll like it.

Note: the Recent Items menu won’t change instantly. If it was set to remember ten items, and you change it to 20, you will still see ten… until you use your Mac a bit more. Check back later and see if the list has grown. Basically, what you’re doing when you increase the number from 10 to 20 is you tell the Mac to NOT remove the tenth item in the list when you add an eleventh. Apple menu/System Preferences/General/Recent Items: set to 20 or more.

4. Show the Day of the Week and the Date in the menu bar
How much time have you wasted wondering, “What’s the date?” Yes, you can click on the time in the menubar and get the date that way, but why not show it all the time? You can have it all: date, time, and the day of the week, all at a glance. It only takes two seconds to click the time, I know, I know, but those seconds add up. Do it once a day and that’s 730 seconds, or twelve whole minutes and change, per year.


5. Turn off “Hot Corners”
Does your Mac’s screen seem to jump around when you move the mouse to certain places? That’s probably because you have “Hot Corners” turned on. Hot Corners let you tell the Mac to do certain things when you move the arrow pointer to any of the four corners. (The most commonly seen “certain thing” is “Show the Desktop.”) This is a Bad Idea, as you will almost certainly trigger Hot Corners by accident many, many more times than you will do it on purpose. The top left corner, in particular, is really easy to accidentally hit, so do yourself a favor and go to Apple menu/System Preferences/Desktop & Screen Saver/Hot Corners… and change every corner to “nothing.” Make it look like the image below.

The Mac’s Apple menu, which you’ll access often, is VERY easy to reach (for a right-handed user). Just slam the cursor up and to the left. It’s impossible to over-shoot it. That’s what makes it so easy to hit! (In comparison, try aiming at any spot in the middle of the screen– it’s much harder, because you can over-shoot.) There’s a reason they put the Apple menu in the top left corner. Don’t mess it up by having a Hot Corner up there.
6. Turn off magnification in the Dock
The Dock is handier when it isn’t squirming around, but squirming around is what it does when it magnifies icons when you hover over them. It looks pretty, but it’s way slower to use, because things aren’t exactly where they were the last time you clicked on them which makes them harder to click. Muscle memory is important if you want to use the Mac efficiently, so let’s make the Dock quit changing. Make the Dock big, of course (Size control: make it “Large”). But turn the magnification off, unless “pretty” is more important to you than “easy to use.”


My advice: make the Dock as big as it can be, with magnification turned off. If you have a laptop put the Dock at the right side and automatically hide and show the Dock. If you have a big screen, put the Dock wherever you want (but know that the left side is where most windows want to be, so you may overlap things if you put the Dock at the left). Apple menu/System Preferences/Dock.
(For more great reading on the topic of “an interface that squirms around is an inefficient interface” visit this page on Bruce Tognazzini’s website. )
7. Turn off FileVault
This one’s a little controversial, but this is my recommendation: turn off FileVault encryption. Many people think “FileVault is security, more security is better, I should turn FileVault on” but in most cases, the downside is bigger than the upside.
The downside is, if you forget the password you used to encrypt the disk, and you lose the File Vault Encryption key that Apple sets up for you, you’ll lose all of your stuff. If the disk fails you’ll have a much harder time recovering stuff from it. And if you care about performance, FileVault slows things down (a lot at first, a small amount after that). So that’s two downsides.
The upside is, if someone steals your computer, they won’t be able to see what’s on the disk. That sounds good, except this hardly ever happens. And besides, encrypting your Mac’s hard drive does nothing to protect you against someone logging into your email server and reading your mail, or making purchases using one of your online accounts, or otherwise posing as you. It’s much, much more likely that you’ll have a problem with the disk than have it stolen. So play the percentages, and get better performance every day, and make it easier for you to recover data if it comes to that.
Here’s another thing. Years ago, when someone died, the family went through drawers and a safe deposit box and a filing cabinet and presto, they had all the important stuff. Nowadays, there’s all sorts of stuff stored on computer hard drives. I’ve been asked many times to help someone get into a deceased loved one’s computer, usually without a password, and I can do it– unless the disk is encrypted with FileVault and no one knows the password. In that case, whatever is on that disk remains encrypted– that is, unreadable. Unavailable. For all practical purposes, lost.

Here are Apple’s own words of warning:
“If you lose both your account password and your FileVault recovery key, you won’t be able to log in to your Mac or access the data on your startup disk.”
To me, the increased security is not worth the downsides. If FileVault is already turned on, consider turning it off. Apple menu/System Preferences/Security & Privacy/FileVault.
8. Set the default accounts for new Contacts and new Calendar appointments and new outgoing Mail messages
If I had a dime for every time someone called with “My contacts aren’t synching” or “My appointments don’t show up on my iPhone” or “I sent an important email out using my personal email address rather than my business one” I would have… a lot of dimes. Solving this problem after the fact is an unnecessary time-waster. The high-performance thing to do is to prevent the problems from happening in the first place.
8.1 How to set the default account for new Contacts
This one’s easy: go to the Contacts app, then choose Preferences… from the Contacts menu, and then click the Accounts button at the top, and then choose a default account.
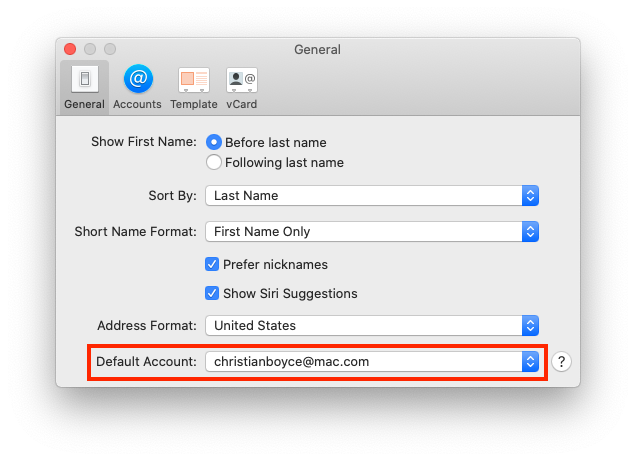
(If you don’t see an option to choose a default account in Contact it’s because you only have one account. Problem solved before it started!)
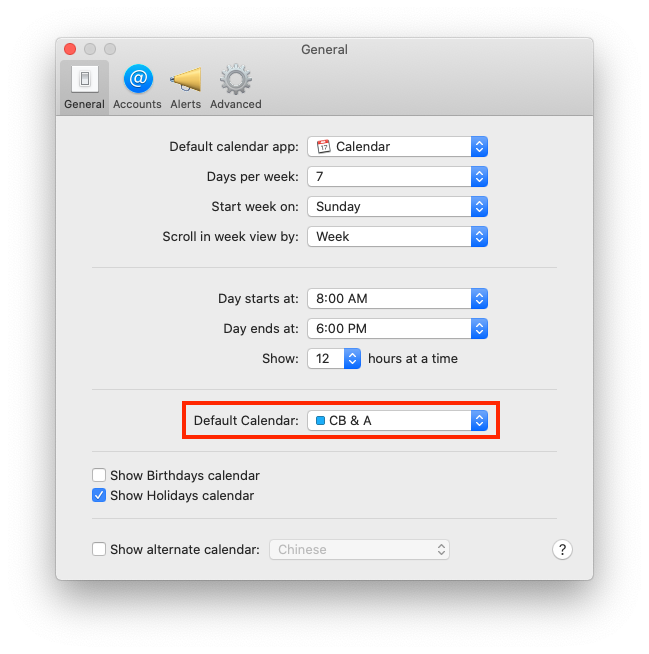
8.2 How to set the default account for new Calendar appointments
Get the Calendar app up, then go to Calendar/Preferences… Click the General button at the top, then choose a Default Calendar. Tip: do NOT choose “Selected Calendar.” If you do, you lose control, because new calendar items will be placed into the calendar of the event you last clicked on, which means you’ll almost certainly mis-categorize some events by mistake. Specify a calendar yourself (like “Home” or “Work”) rather than Selected Calendar and prevent mistakes that you’d have to spend time fixing.
8.3 How to set the default account for new outgoing Mail messages
This is a really important one, because if you don’t specify a default account, Apple will choose an outgoing account for each email you write, on a case-by-case basis. That is, Mail might use your personal email address for some outgoing Mail messages, and it might use your work email address for others. Better to specify it yourself and always know.
Specifying a default account for new outgoing emails is easy: get the Mail app open, then go to Mail/Preferences…, then Composing, and then, next to “Send new messages from:,” choose the account. Do NOT let Apple choose “Automatically select best account” unless you like the excitement and mystery of not knowing what Apple will do.

9. Turn off sleep.
One thing that Macs don’t do so well is wake up from sleep. In my experience, which is some 30 years plus, if there’s one thing that causes problems on a Mac it’s waking up from sleep. So don’t let it sleep! The screen can go dark– but that’s not “sleeping.” Sleeping is an almost complete shutdown of the machine, including the screen, but also the circuitry inside, and that’s what doesn’t come back to life very quickly. You’re better off with a Mac whose screen is dark while the computer part is still wide awake, because it will leap back to life as soon as you click the mouse or tap a key on the keyboard. So set it up that way. Also, don’t put your hard disks to sleep. The time spent spinning up to speed is time lost. Uncheck that box.
Here’s how I’d set up the Energy Saver in the System Preferences.
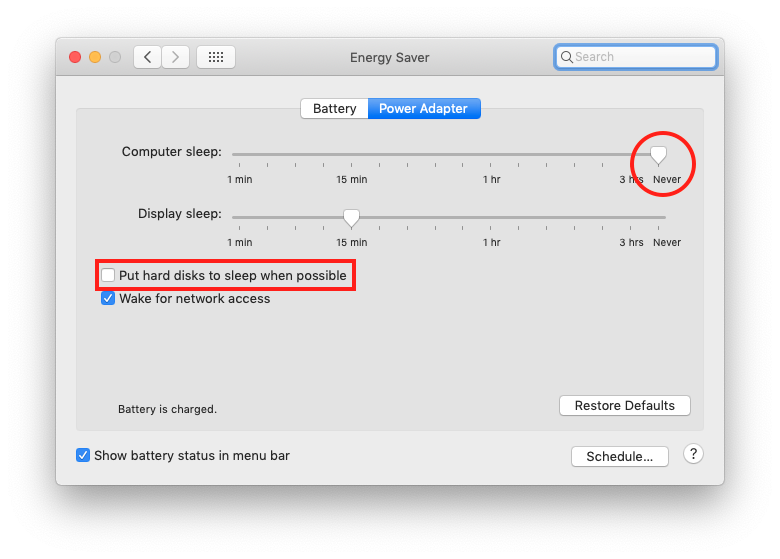
If you’re worried about draining your laptop’s battery, note that you can set things up differently for when you’re running on battery power. Do what you need to do there so your battery lasts longer. But when you’re plugged in to power, turn the computer sleep off, and uncheck the hard disk sleep thing.
(Your Energy Saver preference pane may look a little different than mine. That’s OK. Just take care of those two items and you’ll be fine.)
10. Adjust Finder settings so you can find your files faster
You can really waste a lot of time looking for files, or having a file in “Recents” and wondering where it is on your hard disk, or downloading a file and hunting around for it in the Downloads folder. Use these tips to make working with files a breeze.
10.1 Make some changes in the View menu.
Make sure the Finder is showing the Toolbar, the Status Bar, and the Path Bar. Do it in the View menu– make sure you choose to “Show” each of those things.

Those settings turn this:

Into this:
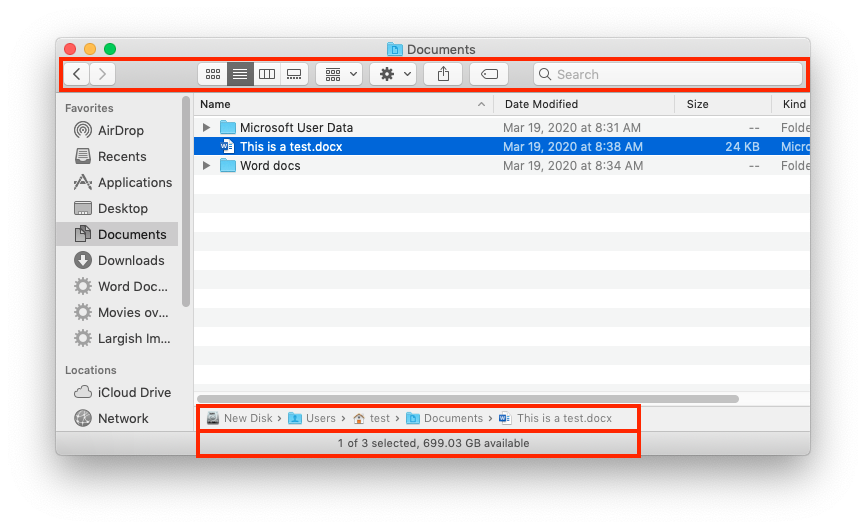
Look at all that great info. You know the path to the file, you know how much room is available on the disk, you have buttons to click across the top, and as a bonus, when you turn on the Toolbar, the Sidebar shows up too.
10.2 Turn on the column for “Date Added”
You won’t believe how handy this is. But once you set this up, you’ll use it all the time.
A typical Finder window, displayed in List View, shows the following columns: Name, Date Last Modified, Size, and Kind. That’s often enough. But for a folder like Downloads, or Desktop, sometimes it’s easier to find something if the folder’s contents are sorted by the Date Added rather than the date modified. So turn on the Date Added column, and sort by that, and see if it’s easier for you to find stuff. I’m betting it will be.
Turn on the Date Added column by going to the View menu and choosing “View Options.”

Choosing “Show View Options” leads to this window:

Check the box next to Date Added and you’re all set. Note: Whatever you do in the View Options window is for the folder you’re looking at, not for every window– unless you click Use as Defaults. FYI.
One more: make sure you have a backup!
Backup disks are cheap. They’ll save you gobs of trouble should you ever need to recover a single file, or an entire disk. Read my article about setting up Time Machine, and buy your new Mac a backup disk. Here’s a link to some recommended backup disks. This tip isn’t performance based, but if you lose a file you’ll save a ton of time by having a Time Machine backup.
Copyright 2008-2024 Christian Boyce. All rights reserved.Did this article help you?
Maybe you'd like to contribute to theChristian Boyce coffee fund.

Want some some quick iPhone how-tos?
Visit me at iPhoneinaminute.com.
Looking for quick tips about Macs?
See my One-Minute Macman website!

Please Leave a Comment