
Updated November 1st, 2022.
When your internet service doesn’t work it’s hard to know why it doesn’t work. The usual routine, which usually works, is to address as many possible sources of trouble, and hope that one of them fixes it. As a refresher, here are the things to do:
- Call your internet service provider to see if there’s an outage in your areas. Often, they’ll know about the problem before you do, and you’ll hear about it on a recording. So then you just wait for them to fix it.
- Restart your modem and other networking equipment. This means disconnect them from power by unplugging them from the wall or power strip (they almost never have power switches), waiting a minute or two, and then plugging them back in. Wait a few minutes for the devices to fully restart.
- Restart your Mac(s) and iPhone and iPad.
Those three steps will solve a lot of problems. But sometimes, they won’t. Here’s the story of one such situation, and how we solved it.
The Problem
The WiFi signal was strong, the equipment had all been restarted, but mail couldn’t be sent or received, and web pages could not be loaded. A phone call to the internet service provider assured us that the service was working, no outages, modem was working fine, etc. So now what?
Note: do not mistake a strong WiFi signal with “the internet is working.” The WiFi signal shows your device is connected to a WiFi access point such as Eero (my favorite) or an Airport or Time Capsule or the box provided by the internet service provider. That’s all it tells us. It says nothing about the connection to the outside world, or the ability to send and received data over the internet. All the WiFi signal tells you is the connection from your machine to that box is good– an important bit of information, but not enough to say “My internet is fine.”
The Solution
This sounded like a networking issue to me so we had a look at the Network preference pane, in System Preferences. The part we were interested in is “DNS.”
What is DNS?
DNS stands for “Domain Name Server.” That’s your Mac’s first stop on the way to loading a web page, or getting mail, or anything else internet-related. This is super important, since the internet works on numbers, and we are typing in letters. It’s a lot like a phone book: you want to call “Steve” so you look him up in your address book to find out his number. Even if you ask Siri to “Call Steve” the name will be searched for, the corresponding number will be found, and the call will be made using that number. It’s the same deal when you’re going to a website: you ask for “www.christianboyce.com” but since the internet works on numbers, somehow the IP address of christianboyce.com has to be looked up. It turns out that, as of this writing, the IP address of christianboyce.com is 216.92.134.247. As with phone numbers, this might change someday (because I could switch to a different web host with a different address, or my current web host might move my site to another server). But, unlike your Mac’s phone book, when the IP address for a website changes, everything still works, because it’s all updated behind the scenes.
For example, we know that christianboyce.com is currently at 216.92.134.247. Let’s say I move to another web hosting company and my site is then on 142.172.123.167. You wouldn’t even need to know, because the big list of domains (christianboyce.com) and IP addresses (216.92.134.247) would be updated without you doing anything, so you’d still type in “christianboyce.com” and although the site had been moved, you’d still find it. Magic.
If you want to know more about the DNS system check out the video on this page: What is DNS?
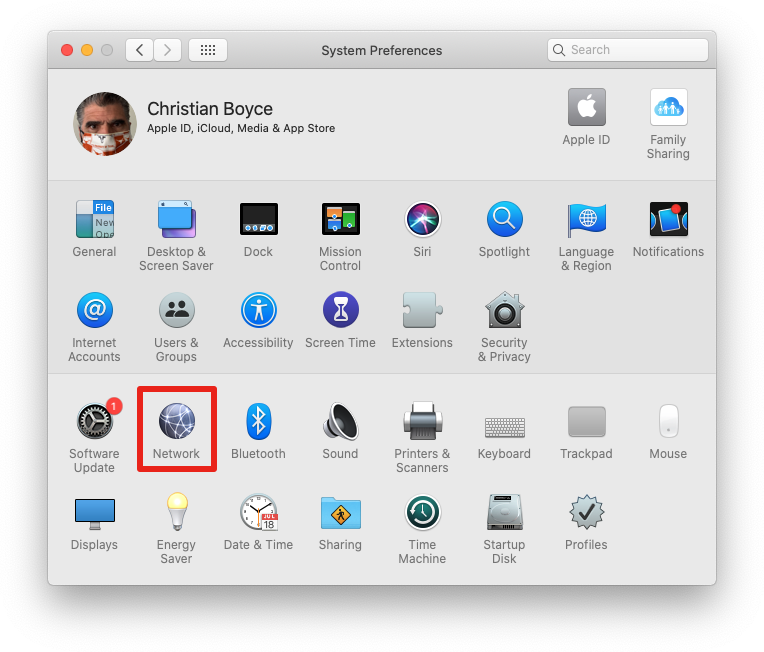
Here’s how we got to the DNS settings. First, we opened System Preferences and clicked on Network.
Then, we clicked on the kind of connection we had (WiFi) and then clicked Advanced… at bottom right.


The DNS section of the Advanced section of the Network preference pane shows the IP address of the machine our Mac will look to when trying to load a web page, or connect to a mail server, or anything else having to do with the internet. It’s gray here because it’s been provided automatically. (The address given is the address of the internet router, typically part of the package provided when one signs up for internet service.)
A typical home installation will have DNS settings looking a lot like what you see above. The number might be 192.168.0.1, it might be 192.168.1.254, or it might be 192.168.0.254 (or a few others) but in any case, if it’s gray, the number was provided to your Mac by some other device (the router) on your network. Very very typical situation.
When your Mac is set up this way it means that you’re not specifying how your Mac looks up IP addresses. Rather, you’re relying on someone else to do it for you. The “someone else” is the router, and the router is (most likely) going to get its information from the internet service provider’s servers. It sounds complicated but the bottom line is, if anything upstream from your Mac has a problem or can’t do its job, your Mac won’t be able to load web pages or get mail etc.
This was exactly the situation I thought we might be in. Something upstream from the Mac wasn’t working properly, so we couldn’t load web pages.
Turns out you can control where your Mac turns when looking up IP addresses. You don’t have to use the default, grayed-out server that you get automatically– there are free services out there and you can enter their addresses in the DNS section manually. From then on, you’ll be using that service to look up IP addresses.
One such service is Google’s DNS. Their numbers are easy to remember: 8.8.8.8 and 8.8.4.4. Another is OpenDNS, which also provides filtering so you can block phishing and porn sites and other stuff that you don’t want. (See my article about OpenDNS here.) We chose Google’s DNS, partly because I was doing this work over the phone and I wanted to make it easy for the person on the other end to type in the numbers. “8.8.8.8” is pretty darned easy! OpenDNS’s numbers (208.67.222.123 and 208.67.220.123) are not quite as easy.
To enter a DNS server manually you click the “+” at bottom left of the DNS pane, then just type it in.
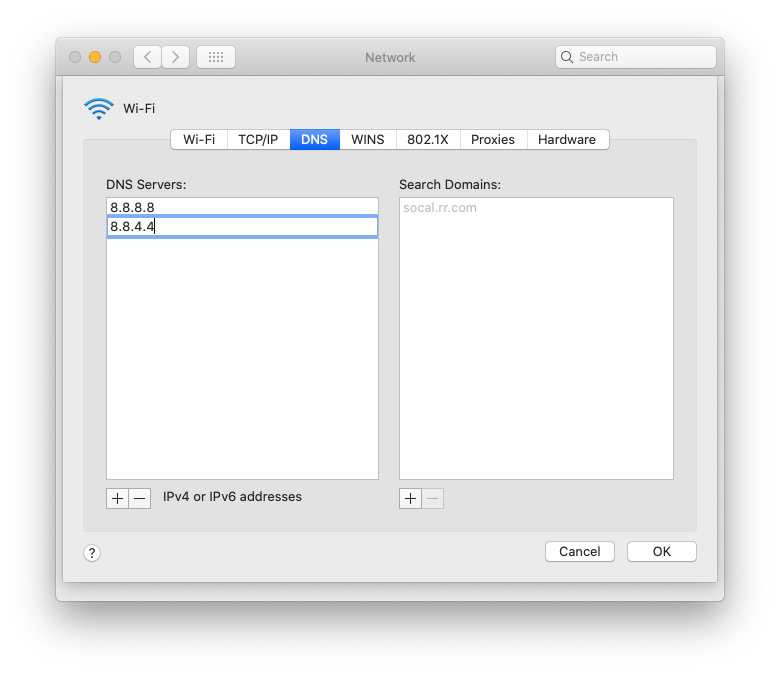
We clicked the OK button, then the Apply button in the next window, and… it worked! We were back on the internet. (If it hadn’t worked we would have used the minus button down at the lower left to remove those servers and go back to the default gray one.)
The End?
Well no, not quite. We’d fixed the problem for the Mac– we routed the Mac’s internet traffic through Google’s servers rather than the default (Spectrum Internet), which solved the Mac’s problems. But that did nothing for the other devices in the house (iPad, iPhone). Yes, I could have walked the customer through changing DNS settings for her iPad and iPhone also, but time constraints kept us from doing that. Instead, we just charged along on the Mac, happy that we could load web pages and get mail, and waited for the internet company to fix the glitch that cause the problem in the first place. At that point, the iPhone and iPad would work over WiFi again also.
It’s important to recognize that this situation arose due to a problem with the internet service provider, one that they would surely fix very quickly due to the number of calls they’d be getting about it– but not quickly enough for us. We solved it by going around them.
If we’d changed the numbers in the router to be 8.8.8.8 and 8.8.4.4 (or the OpenDNS numbers) then every device in the house would automatically use those numbers, and no changes would have to be made on the devices themselves. That is, instead of changing DNS numbers on the Mac, we’d change them on the router. We could have, but that is a lot harder than what we did, and as predicted the internet service provider soon corrected their issue, which meant that the automatic numbers that the iPhone and iPad were using soon worked properly. Advanced users might want to look into changing the DNS settings on their routers so they use either Google’s or OpenDNS’s, something that could result in a slight speed increase as well as phishing and porn blocking for every device on the network. That’s a great thing to do, but with leased equipment (from the ISP) you might not be able to make those changes, and the changes might get wiped out during an upgrade (and definitely they’ll get wiped out if you get new equipment). If you own the router, and you know how to configure it, I’d set it up to use the OpenDNS servers, or the Google servers, so everyone on the network can benefit.
One more thing about DNS. Some networks, such as those provided by hotels and airports, may not work if you’ve specified DNS servers in your Mac’s settings. This is because the providers of those networks want to be able to monitor what you do on their networks, and if you go around them via Google or OpenDNS they won’t be able to do it. So, they force you do use their DNS by refusing to allow any traffic to pass unless it goes through their DNS. For that reason, for a laptop that moves around a lot, changing DNS numbers could be a problem, and therefor I do not recommend doing that. For a stationary, desktop Mac, do whatever works, but for a laptop, leave the DNS settings alone so the DNS numbers are always taken from the network it’s connected to, automatically.
Copyright 2008-2024 Christian Boyce. All rights reserved.Did this article help you?
Maybe you'd like to contribute to theChristian Boyce coffee fund.

Want some some quick iPhone how-tos?
Visit me at iPhoneinaminute.com.
Looking for quick tips about Macs?
See my One-Minute Macman website!

Please Leave a Comment