Updated December 19th, 2015.
Eight for 8, Day Seven. Feeling lucky.
Some of iOS 8’s new features are more like refinements of old features, and some of them are a little on the subtle side. In fact, some of them are so subtle you might not notice them– but that’s why I’m here, to point them out for you. Here’s one now.
iOS 8 Tip #7: Set the Camera’s Focus and Exposure Independently
Until iOS 8, the standard Apple Camera app set focus and exposure wherever you tapped on the screen. That was actually pretty powerful and many a potentially-bad photo turned out downright decently thanks to a well-placed tap. The only problem was, in some cases the thing you wanted to focus on wasn’t the thing you wanted to expose for. So you compromised, but you didn’t think of it like that because it was a miracle that you could set the focus and exposure at all, and besides, the pictures almost always turned out great.
However, as it is with other things, as soon as you find out how to set focus and exposure independently, as you can in iOS 8, you realize how deprived and unhappy you’ve been up to this point. You didn’t know what you were missing (because it wasn’t invented yet) but you will in a minute.
Let’s have an example.
Suppose you have a bunch of junk on your desk, and a small stuffed duck, and you want to take a picture of the duck.
The duck isn’t really in focus so I tap on it, and I get the second picture:
That’s better, focus-wise but the exposure’s not right. It’s just too dark. (Memo to those who might want to take pictures of a small stuffed duck: do it during the day, when the light is better. Also, clean off your desk first.)
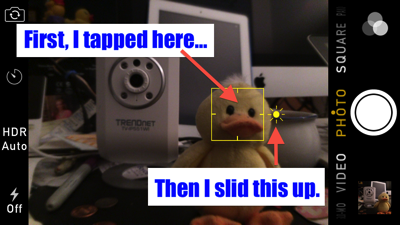
The next picture shows an in-focus duck, and the exposure is much more to my liking. That’s because I took advantage of iOS 8’s ability to let me set focus and exposure independently.
Here’s how it works.
Get the camera app going and compose your picture. Tap where you want the camera to focus, same as you’ve done in iOS 7 and earlier. Then, notice the little sun icon to the right of where you tapped. You can drag that sun up and down to change the exposure. Do that until you’re satisfied, then take the picture.
It sound simple because it IS simple. And it makes your pictures better than ever. Try it while you’re thinking of it– you’ll be an expert in no time.

(Note: I had to enhance the screenshot to make the yellow box around the duck, and also the little sun/exposure icon, easier for you to see. They won’t be quite as bright in real life.)
Apple put a bunch of other features into the Camera app, including a self-timer, a time-lapse mode, and a faster burst mode. You should poke around and experiment with these features so you’ll know how to use them when the need arises. Sometimes you get but one chance to take the picture; do some practicing ahead of time so you’ll be ready.
And that, ladies and gentlemen, is iOS 8 Tip #7.
Links:
- iOS 8 Tip #1: The Two-Finger Down-Swipe
- iOS 8 Tip #2: Actionable Notifications
- iOS 8 Tip #3: Audio Texts and Video Insta-Selfies
- iOS 8 Tip #4: Faster Typing, Thanks to the Predictive Keyboard
- iOS 8 Tip #5: Hands-Free Siri
- iOS 8 Tip #6: See the Battery Usage, per App
- iOS 8 Tip #7: Set the Camera’s Focus and Exposure Independently
- iOS 8 Tip #8: Make and Answer Phone Calls From Your iPad
Copyright 2008-2024 Christian Boyce. All rights reserved.
Did this article help you?
Maybe you'd like to contribute to theChristian Boyce coffee fund.

Want some some quick iPhone how-tos?
Visit me at iPhoneinaminute.com.
Looking for quick tips about Macs?
See my One-Minute Macman website!
Please Leave a Comment