Updated December 18th, 2015.
You have questions, we have answers. It’s a match made in Heaven. Today’s question:
“What happened to “Search For” in the Finder sidebar? I liked being able to use this occasionally and don’t understand why it was dropped. Is there any way to get it back? Thanks. Sincerely, Anonymous.”
What a great question, with a double-duty answer. With one blog post we can solve a problem for Lion users while simultaneously introducing Snow Leopard users to something they might not know about. I can’t wait.
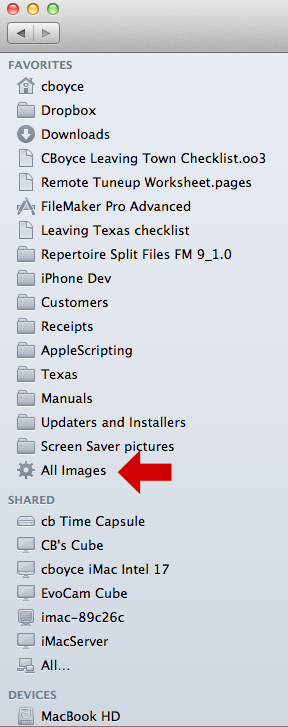
Here’s a refresher, for those of you wondering what Anonymous is talking about. The Finder in Snow Leopard has something in its Sidebar that Lion doesn’t have, and I’ve bordered it here in red.
By default, without you doing anything, Snow Leopard has this nifty “Search For” section, and when you click one of the items in that section the Finder shows all of the files that match. Here, I clicked “All Images” and Snow Leopard’s Finder is showing 9,997 image files, from all over my hard disk.
You will also notice the “Today,” “Yesterday,” and “Past Week” items. Click them to find all of the files that have changed for the given timeframe. If you’ve ever forgotten what you named a document, but you know you worked on it yesterday, clicking on “Yesterday” in the Search For section will help you find it.
You can see that this “Search For” stuff could be handy. But Lion doesn’t have it. Here’s a look at the Sidebar in Lion’s Finder– no “Search For” to be found.
It’s just not there. What a drag.
The good news is you can put it back with just a little work on your part. The really good news is that you can do even better than the standard Search For section (and that goes for you non-Lion users– what you’ll learn here will work for you in Snow Leopard and “regular” Leopard too).
Here’s how you do it.
First, click on the Desktop, or the Finder icon in the Dock, or on a Finder window– the point being that Step One is to be sure the Finder is the active program. Not sure? Look up by the Apple menu. If the next thing to the right says “Finder” you’re ready to go. If not, click the Desktop (or the Finder icon in the Dock, or on a Finder window) and make it so.
Next, go to the File menu and choose Find. You’re going to find something.
In this case, we’re going to find every image on the hard disk– that is, we want “Kind” to be “Image.” Here’s what the top of the Find box looks like. (Note the Save button. We’re going to save our Find criteria when we’re done.)
![]()
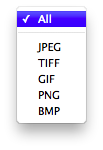
Click where it says “Any” and change it to Image. You will get another little menu next to that menu, where you could, if you wanted to, choose to only find JPEG or PNG or whatever. Leave it set to “All.” Then click the Save button. 

What you’re doing here is saving the Find requests. Give it a good name and be sure the Add to Sidebar box is checked. Don’t worry about where to save your search– Apple takes care of that part for you. See the picture below.

Now have a look at your Finder’s Sidebar. Your saved search will be there. It won’t have a red arrow pointing to it like mine does here but it will be there.

Nice going. Now try another one! Go to File, come down to Find, and let’s make one that says “Last modified date is yesterday.” Here’s how it looks:
![]()
Save that one with a good name… then do one more for “Last modified date is today” and you’re well on your way to recreating the complete “Search For” section that Apple left out of Lion.
Here’s how Lion’s Finder Sidebar looks on my Mac after adding the three saved searches we did here (and I have clicked on the All Images search so you can see what it does).
You can really go to town with this technique, searching and saving and displaying your saved searches in the Sidebar as much as you want to.
Here’s the kicker: you can do all of the above in Snow Leopard (and Leopard) too! Of course, you don’t have to do it, because Apple’s put All Images, and Today, and Yesterday in the Sidebar already– but you can do so many other things using this technique! Search for every document that has the word “Barbeque” in it! Find every image that was modified within the last 30 days! Find every PDF whose size is greater than 5 megabytes! The sky’s the limit. Do your Find, click the Save button, give it a good name– and from then on, any time you click the saved search in the Sidebar, it’s as if you manually did a Find the hard way.
If you’re wondering whether these saved searches are “live”, the answer is YES. You’re saving the search criteria, not the search results. Every time you click a saved search in the Sidebar it does the search all over again. It’s always fresh.
Here are a couple of bonus nifty things that you should know about.
- Technically, what you’re doing here is making “Smart Folders.” That’s what Apple calls them.
- You will see similar “Smart” items in iPhoto (“Smart Albums“) and in iTunes (“Smart Playlists”).
- You can drag your Smart Folders upward in the Sidebar but only if you click on the little gear icon (not on the name).
- You can control-click a Smart Folder and “Show Search Criteria” if you want to make adjustments, or even just to remember what your Smart Folder does.
- You can Command-drag a Smart Folder out of the Sidebar if you want to get rid of it. However, this does not really delete the Smart Folder. It just gets it out of the Sidebar.
Gee that was fun. Thanks for the question, Anonymous!
Copyright 2008-2024 Christian Boyce. All rights reserved.
Did this article help you?
Maybe you'd like to contribute to theChristian Boyce coffee fund.

Want some some quick iPhone how-tos?
Visit me at iPhoneinaminute.com.
Looking for quick tips about Macs?
See my One-Minute Macman website!
Thanks for the solution. But how do I get rid of the "savedSearch" extension? The "hide extension" box doesn't appear when I save the search. So it shows in the sidebar as "Today.savedSearch"
Thanks.
Hi again… you are seeing the names with ".savedSearch" on the ends because these "Saved Searches" are really files, not folders– and the extension for a "Saved Search" document is ".savedSearch." If you don't want to see the extension, go to Finder/Preferences/Advanced and uncheck "Show all filename extensions."
No, you can't just turn off the extensions for the Saved Searches. It's an all or nothing deal. Personally, I turn off the extensions (I uncheck the box).
Perfect. Thanks once again. Great Blog!
Glad I could help you. Tell a friend! The more the merrier.
By the way, there are close to 300 posts here. You can search using the search box at top left, and you can look for posts by category using the links in the sidebar at the left.
You can "share" via Twitter and email and Facebook, and you can "Like" us on Facebook. Anything you do along those lines helps other people find us.
hey – thanks for the blog. this was a great help! I am just wondering if there is any chance to customise the icons in the finder sidebar? and if so how to go about it? it would be nice if it were possible to group these fast finds :).
Hi samiwag… at the moment, you can't customize the icons in the Finder sidebar. You can change ALL of the icons in the Finder sidebar through various "hacky" maneuvers but that's not my style. That sort of thing usually breaks after another system update. Plus, what we really want are icons that can be different from each other, not just different from the usual stock look. I would settle for coloring them…
You can of course grab the gear icon for a saved search in the Finder's sidebar and drag the item up and down in the sidebar. Yay.
Thanks, great help- badly needed. I'll happily spread the word!
You're welcome. Glad that I could help you out.
Thanks… was driving me crazy. I always liked being able to create, put where it where ultimately belong and then email a copy or ftp as needed *** by finding recent work in the Today or Yesterday folder! Now I can do that again.
You're welcome John! Glad I could help.
My hero – awesome, thanks!
Thank you, thank you, thank you!!! The directions were written clearly and were easy to follow.
Hi Christian
.savedSearch comes up by default next to the search name ie. "Today.savedSearch"
Can I remove that? It's just a matter of aesthetics…!)
You can, but then you will remove the extension (everything after the dot) on other files too. Actually, you're just hiding them extensions So a Word doc called "letter_to_Santa.doc" will look like "letter_to_Santa" after you hide the extensions. It will still be a Word document (and your saved search will still work). All you do is… go to Finder/Preferences/Advanced and uncheck "Show all filename extensions."
wow