
Updated November 1st, 2022.
This month it’s all about Mail, on the iPhone and on the Mac.
The Mail app on the iPhone (and iPad) is full of features that help you handle email chores faster, easier, and with less effort. Here are my favorites.
My Ten Best Tips for iOS Mail
- Scroll to top with a tap
- Use the Search box
- Resize text
- Turn your iPhone sideways
- Use the Unsubscribe button
- Signatures with Images and Formatted Text
- Swipe, swipe, swipe!
- Turn OFF Organize by Thread
- Specify the Default Account for sending
- Watch out for Filtering!
1. Scroll to the top
The iOS Mail app presents your mail in a list. Sometimes you get way down the list, looking at older and older messages, and then you want to get back to the top, for the newest ones. Yes, you could swipe down a zillion times, but that’s the slow way. The fast way? Tap either “ear” of your iPhone’s screen, at upper left or upper right of the screen. (Home button iPhone users: tap where you see the time displayed at the top center of the screen.)
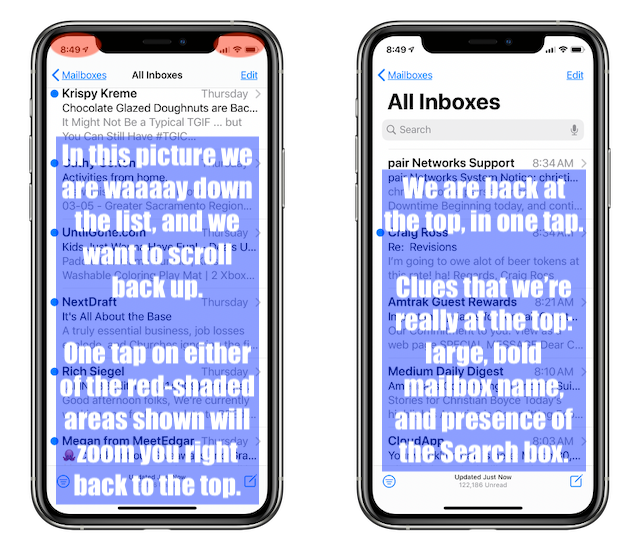
Technically you can make the list scroll to the top by tapping anywhere across the very top of the screen, including in the black part between the ears. It works; try it. But… that’s where the FaceTime camera is, and you shouldn’t be putting fingerprints on the lens if you can help it. So go for the ear.
For more about scrolling to the top of lists, see this post on my iPhoneinaminute.com website.
2. Use the Search box
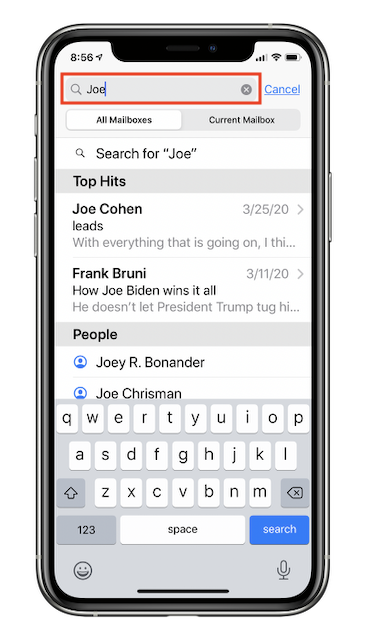
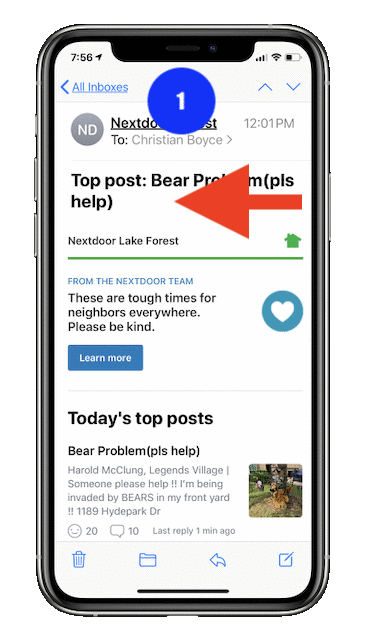
Yes, you can try to find a mail message by visually scanning through, but sometimes that’s really hard. The easy way to find a mail message is to let the iPhone do a search for you. Step 1 is “Find the Search box.” Normally you don’t see it, but if you’re in the List view, and if you scroll to the very top of the list, you’ll see it. (Scrolling to the very top of the list is easy–we just talked about that!)
Step 2 is “Type something in the box.” It can be a person, or just a word or two in the message. Results come in as you type; you don’t have to hit “Return” or “Search or anything like that. Just type.
Note: the iPhone will present some suggested searches right off the bat, before you type anything, and and one of them may include just what you want. If so, give it a tap.

Here I’ve typed “Joe” and look at all these results.
Scroll down to see more options, and results. If you don’t scroll down you’ll miss a lot of good stuff. So scroll down.
If the search results show you a person’s name, and you tap on it, you’ll go to a screen where you can see all messages to that person, from that person, or with that person’s name anywhere in the message (to, from, or in the body).
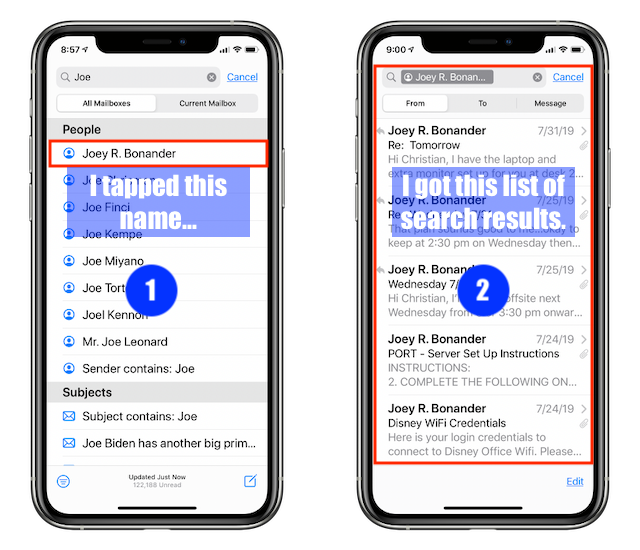
You can narrow down the search by searching only the current mailbox.
While looking at search results, you can tap Edit at bottom right, giving you the chance to select multiple messages, which then gives you the chance to take action on them. For example, you might want to flag some of the messages to make them pop (use the Mark button to get to the Flag options). Or you might want to move them to some particular folder. Or you might just want to trash them. All possible via the Edit button.

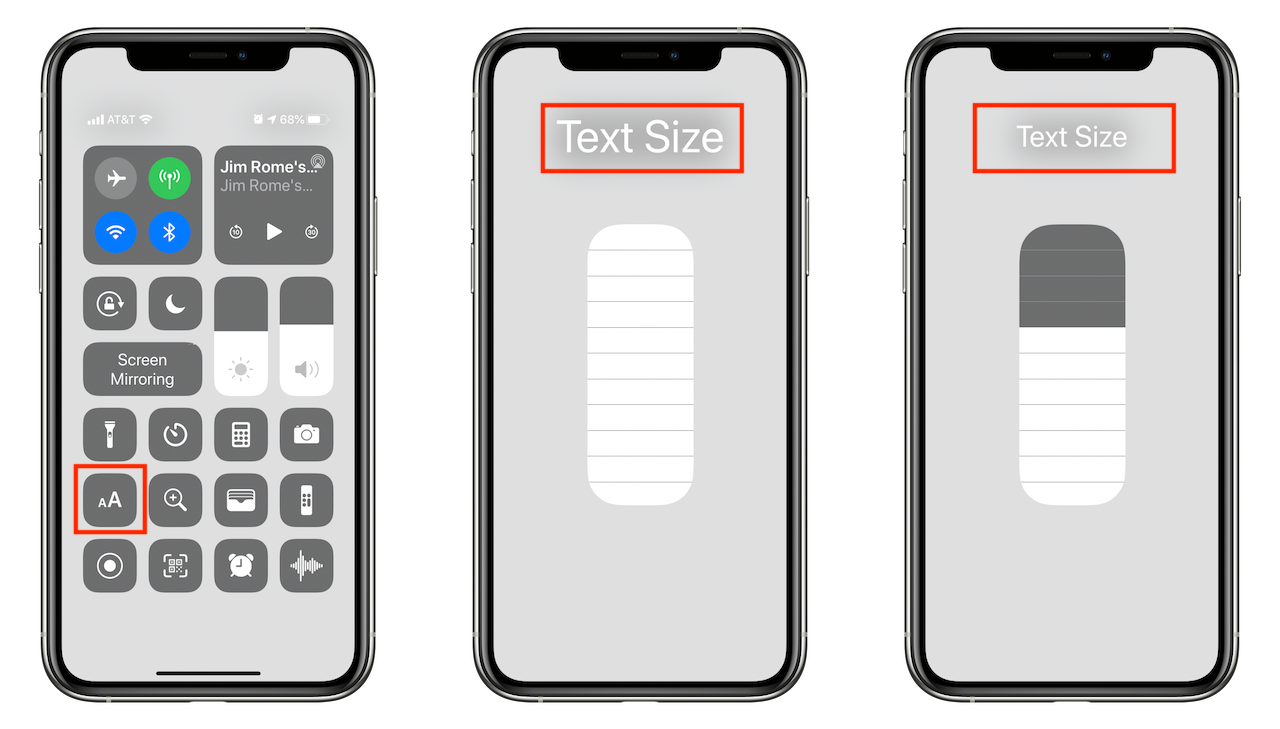
3. Resize Text
A lot of people make the text really big on their iPhones but that has the negative effect of making Mail almost unusable. It’s nice to be able to see the letters but it you’re only getting a couple of words on the screen at a time maybe it’s time to back off a few point sizes.
Ah, but that’s a hassle, right? You have to go to the settings, you have to find where the font size controls are, you have to guess at how big is big enough, and then you’ll have to do it again in reverse when you’re done! That’s a big “yuck.”
If it were easier to change the size of the text you’d do it, wouldn’t you? Well there is an easy way. The trick is to get the Text Size controls into the Control Center (see my article about that for details). When you do that, changing text sizes takes a swipe, a tap, and a drag– with visual feedback– and you do it without leaving the Mail app! See my article about resizing text on an iPhone for details. You might not change the text size often now but when it’s easier to do, you just might.
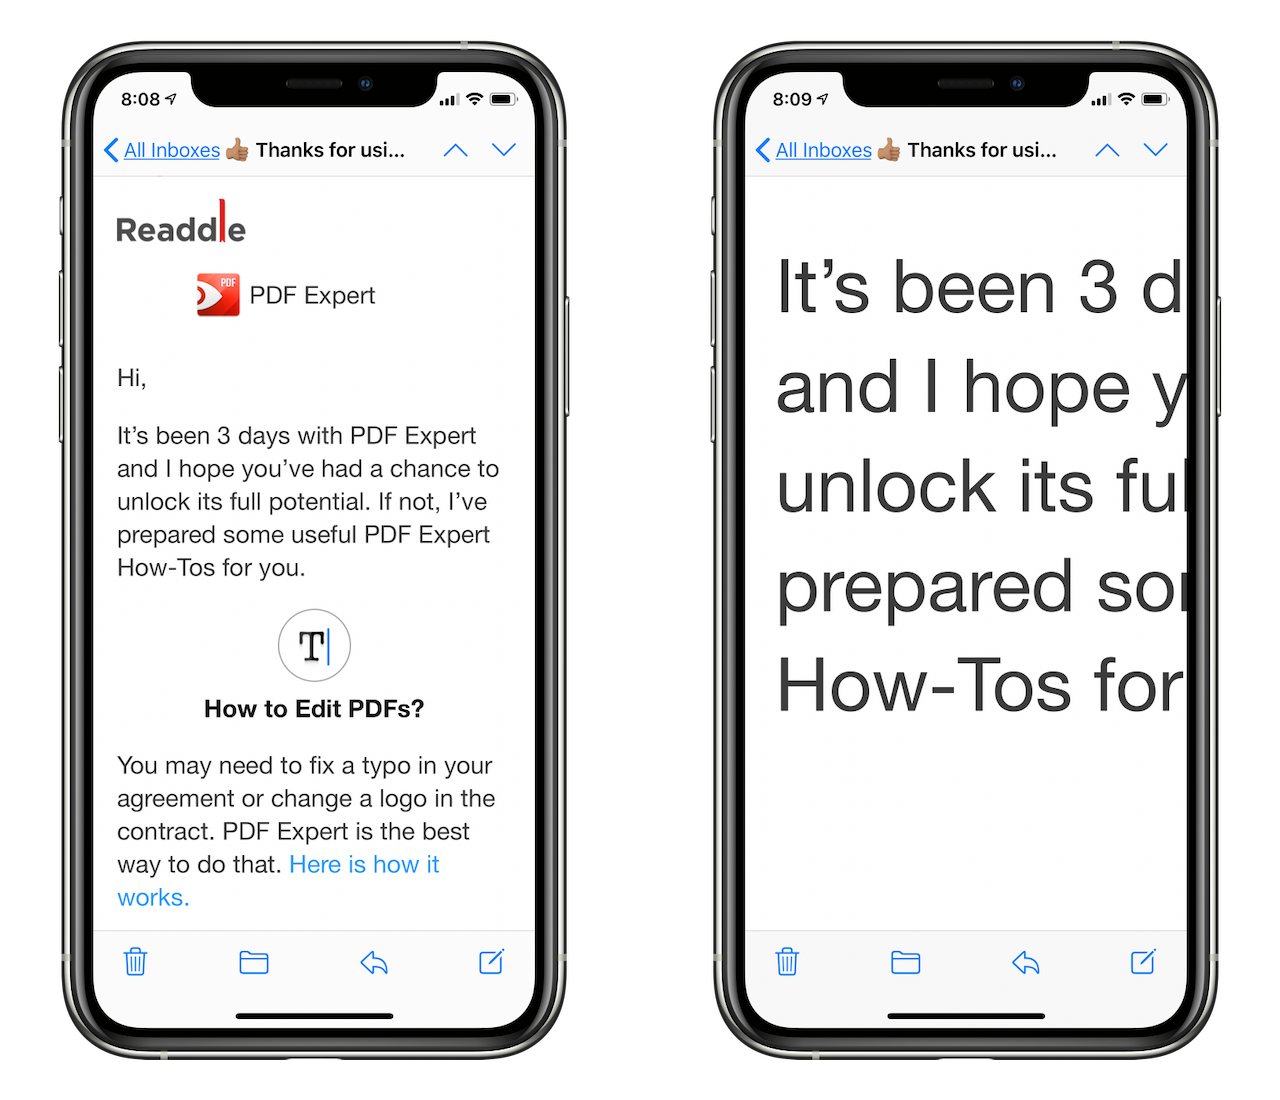
Of course you can make things bigger temporarily, on the fly, by reverse-pinching (that is, spreading) on a message. But then you have to pan around because the text won’t be reflowed. So it’s not such a great thing.
4. Turn your iPhone Sideways
On iPads, and on some iPhones, turning your iPhone sideways gives you another view of things. Rather than choosing an email from the list and having it take up the whole screen, you might (depending on the device) see a list view on the left, and the selected message on the right.
Or, you might just get a different layout. Or you might notice the text got bigger (without you doing anything!) It depends on the device. Bigger iPhones (and iPhones with more pixels), and iPads, can show the list view on the side while oriented horizontally. Smaller devices will just show a different layout, but that’s still a good thing.
Here’s a Mail message on an iPhone XS oriented vertically.
Here’s the same Mail message on an iPad Pro 12.9 (first generation).
Here’s the same Mail message on an iPad Pro 12.9 (first generation), rotated sideways. You can see the list of messages on the left, and the selected message on the right.

It’s worth rotating your iPhone or iPad in Mail to see what happens. (It’s also worth rotating it in other apps– see my article detailing some of the things you get when you turn your iPhone sideways.)
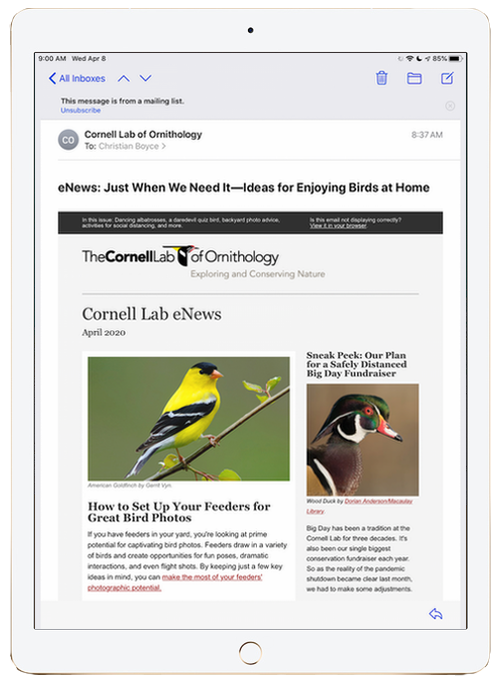
5. Use the Unsubscribe button
iOS Mail has a great feature– an “unsubscribe” button that appears at the top of Mail messages from mailing lists. Bulk (or maybe “junk”) mail, in other words. Tap the Unsubscribe button, and a box pops up where you can confirm or cancel the unsubscription request. Yes, you could probably scroll to the bottom of the message and find the TINY “unsubscribe” button or link and do it yourself, but this way is a lot faster and easier. So do it this way.

Less mail is good! Eliminate the messages from mailing lists you don’t care about and never see them again. (Note: it might take a little while before “never” begins. The unsubscribe message will be sent instantly but the actual unsubscribing, at the sender’s end, will take a little longer.)
Note: Apple added this feature to the Mac Mail app in macOS 10.15. iOS had it first!
6. Signatures with Images and Formatted Text
Used to be, signatures on the iPhone were pretty plain– “Sent from my iPhone.” You couldn’t insert pictures and you couldn’t format text. But now you can. Well, sort of. Formatting text is easy: you do that right in the Signature editor. Settings, Mail, Signatures.
Here I’m making some text in the signature italic but of course you can do the same thing with bold or underlined. You can’t change the font, and you can’t change the size, but you can do a lot with bold, italic, and underlining.
Adding an image to your signature is tricky, but absolutely worth doing. Directly pasting an image into the Signature editor doesn’t work well. What does work well is a website, Mail Signatures.


I visited that site and created this signature in minutes, if not seconds:

That’s a lot nicer than most signatures you’ll see coming out of Gmail.
Tip: if you use Gmail in a browser on your Mac and you want a signature like the one above, get yourself to Mail Signatures and build one. A good-looking signature will make your emails look very professional, especially compared to the ones from everybody else with their crummy plain sigs.
BONUS: this will work on your Mac as well.
So, let’s do it. Go to the Mail Signatures website, fill in the form, and follow the directions. Once you’ve created the signature copy it, then paste it into the Signatures section of Mail’s settings. If you visit the Mail Signatures website from your iPhone you can copy the signature and paste it into Mail’s settings easily. If you prefer to create the signature from your Mac you’ll have to copy the signature, mail it to yourself, copy it out of the email and then paste it into Mail’s settings on your iPhone.
In case you couldn’t tell: I really like the Mail Signatures website! It’s really cool, really free, and they have a really good privacy policy, in case you’re worried about giving your information to yet another company.
BONUS #2: when you make a signature using the Mail Signatures site, what you’re really doing is adding HTML code to your email which pulls in your image from a server. Yes, this means you have to stash your image/logo/photo on a server somewhere (hint: Google Drive), but the payoff is that your image doesn’t come in as an attachment! I’m sure you have a friend who has an email signature with an image in it, and every email that person sends looks like it has an attachment. That’s because that person isn’t doing it this cool way. Your friend might think it doesn’t matter but it does… when you’re looking for an email with a “real” attachment it’s no fun when every single email seems to have one!
7. Swipe, swipe, swipe!
You can do all sorts of things in iOS Mail by swiping. Try these moves, and see if you can find more!
7.1 Swipe a message to the right
In the list view, if you swipe a message to the right, you get the chance to flag it. Technically you might get a chance to do something else with it– depends on your Mail settings.
You might be surprised to find this works whether you’re looking at a list, or actually reading a message. See below, and try it!
7.2 Swipe a message to the left
In the list view, swiping a message to the left gives you more options:
You might be surprised that this one also works when you’re actually reading a message. See below!
7.3 Swipe a message all the way to the left
This is my favorite: swipe a message all the way to left and the message is deleted, all in one move. You’ll see the standard “swipe left” things appear but just keep going. It will look like this when you’re doing it properly.
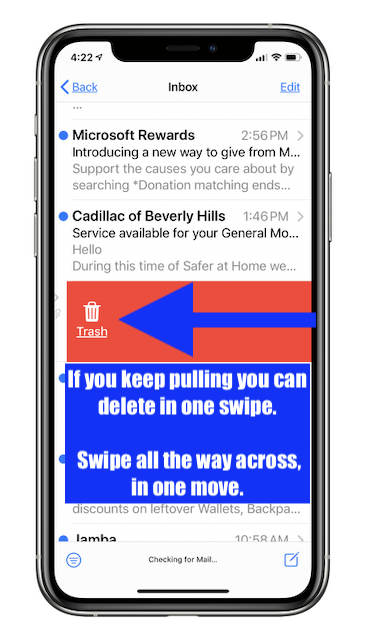
This one does not work if you are actually reading a message. Sorry about that.
7.4 Swipe right, from the very left edge
You know that tapping on a message in the list view and swiping to the right gives you the chance to flag it. But did you know… if you swipe to the right from the very left edge of the iPhone, you “go back one level.” If you’re swiping in the list view, you’ll go back one level in the Mailboxes. That is, let’s say you are reading a message in the “All Inboxes” mailbox. Swiping right from the very left edge brings you back to the mailbox list.
But guess what? It works when you’re reading a message also! So, if you’re looking at a message, and you swipe to the right, from the very left edge, you go back one level… which is to say you go back to the list that message came from. Like so:

If you end up showing the flag you didn’t start your swipe far enough to the left. Start in the white strip to the left of the message, or even further left.
8. Turn off “Organize by Thread”
“Organize by Thread” must be someone’s cup of tea but for the rest of us, it makes reading email confusing as can be because messages aren’t displayed strictly chronologically. “Threading” keeps all of the emails from one conversation strung together (by a thread, get it?) and grouped. Gmail (in a browser) works this way and I guess you get used to it, but for my money, if I know someone wrote me back on a certain date, I want to scroll back to that date and see the message. And I will, because I turned off “Organize by Thread.” Try it yourself– you can easily switch back. Look in Settings, then Mail, then turn OFF everything having to do with Organize by Thread. I think you’ll find it makes more sense to see your mail that way.
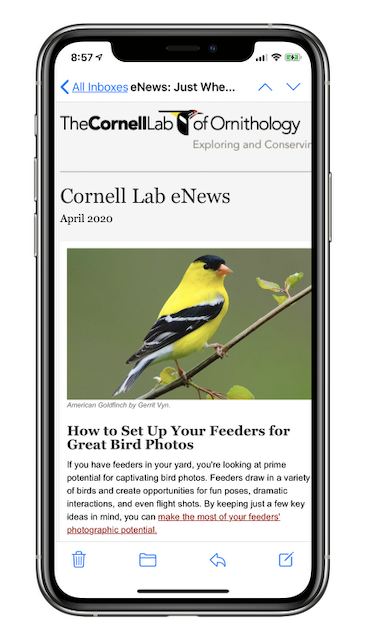
Let’s see an example. My friend Sondra wrote me this afternoon, and it reminded me that she also wrote me this morning around 10:15 A.M. With Organize by Thread OFF I can scroll down in my Inbox to around 10:15 A.M. and of course, there’s the morning email from Sondra. Click the image to see a larger version.

(Click for a larger version)
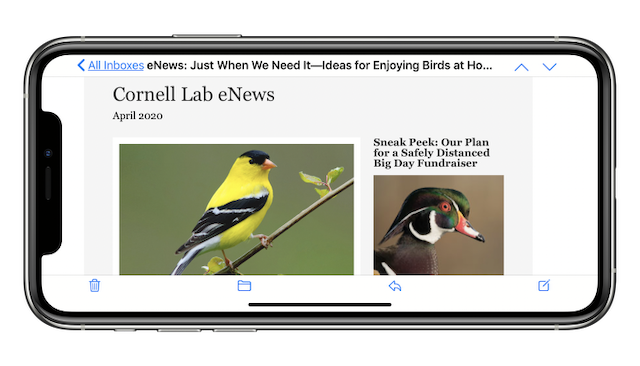
Now let’s see what happens if Organize by Thread is ON. (Click the image to see the details.)
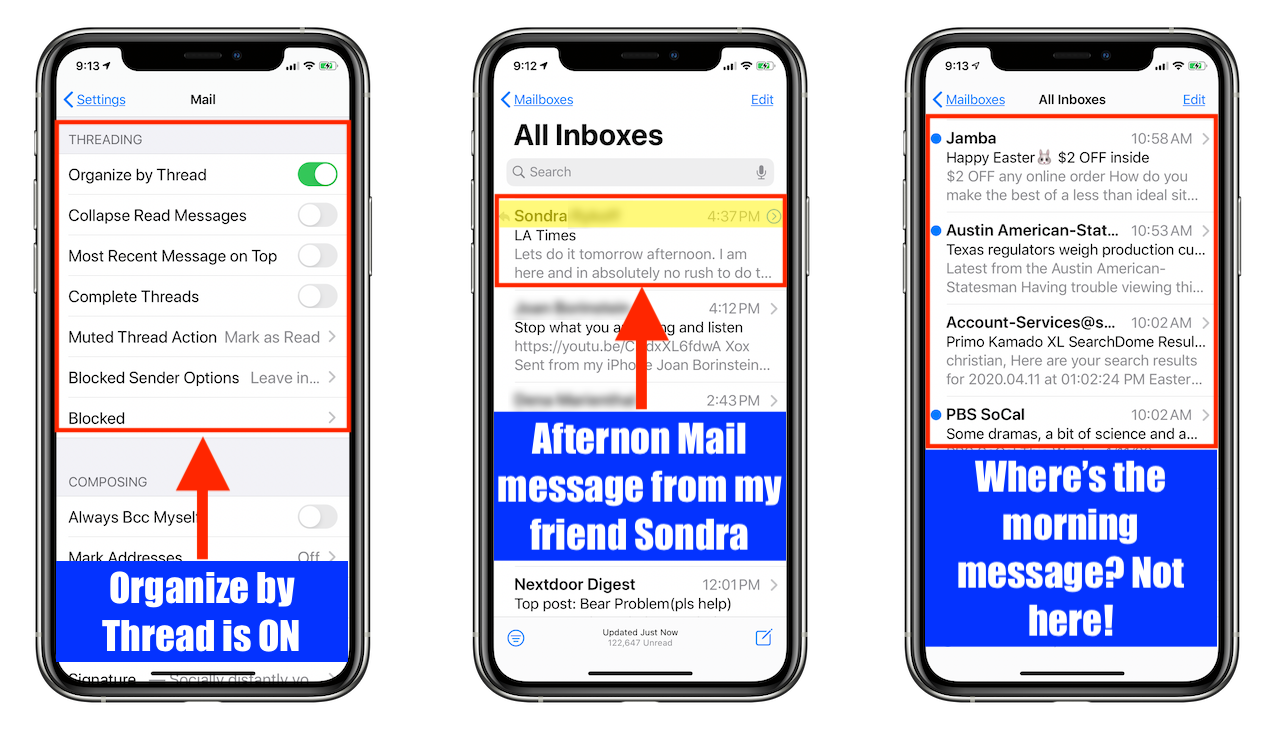
(Click for a larger version)
If I turn Organize by Thread off, the 10:13 A.M. message re-appears, so that message couldn’t have gone far. So where is it, when Organize by Thread is on?
It’s hidden behind a button. Look at the first message from Sondra. Next to it, at the right, is a little chevron. Tap that and the 10:13 A.M. message appears– because it was part of the chain, part of the back-and-forth between us. If there had been ten replies they all would have been behind the button.
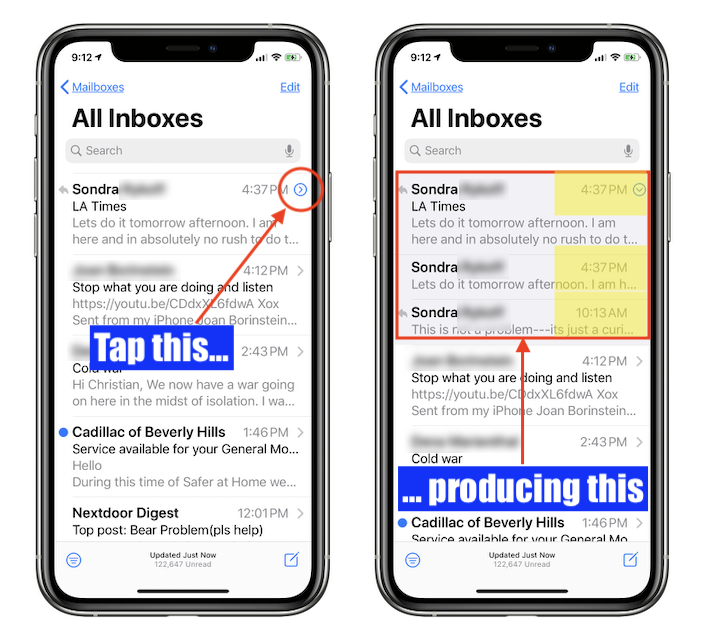
As usual, click the image to see a larger version!
Notice in the above screenshot that the first message is shown twice. I don’t find that helpful. In fact, to me it’s confusing. Of course it’s up to you but for my money, organizing by thread just makes things harder. So turn it off.
9. Set the default account
If you only have one email address you can skip this part, because all of your emails go out from the same account. But if you have more than one your iPhone has to be told which account to send from.
If you go to Settings, then Mail, and then scroll all the way down to the bottom you will see where you set the default account. You will also see, in the fine print, that the account you set there only comes into play for emails “created outside of Mail.” First let’s see the settings, then I’ll tell you what that means.
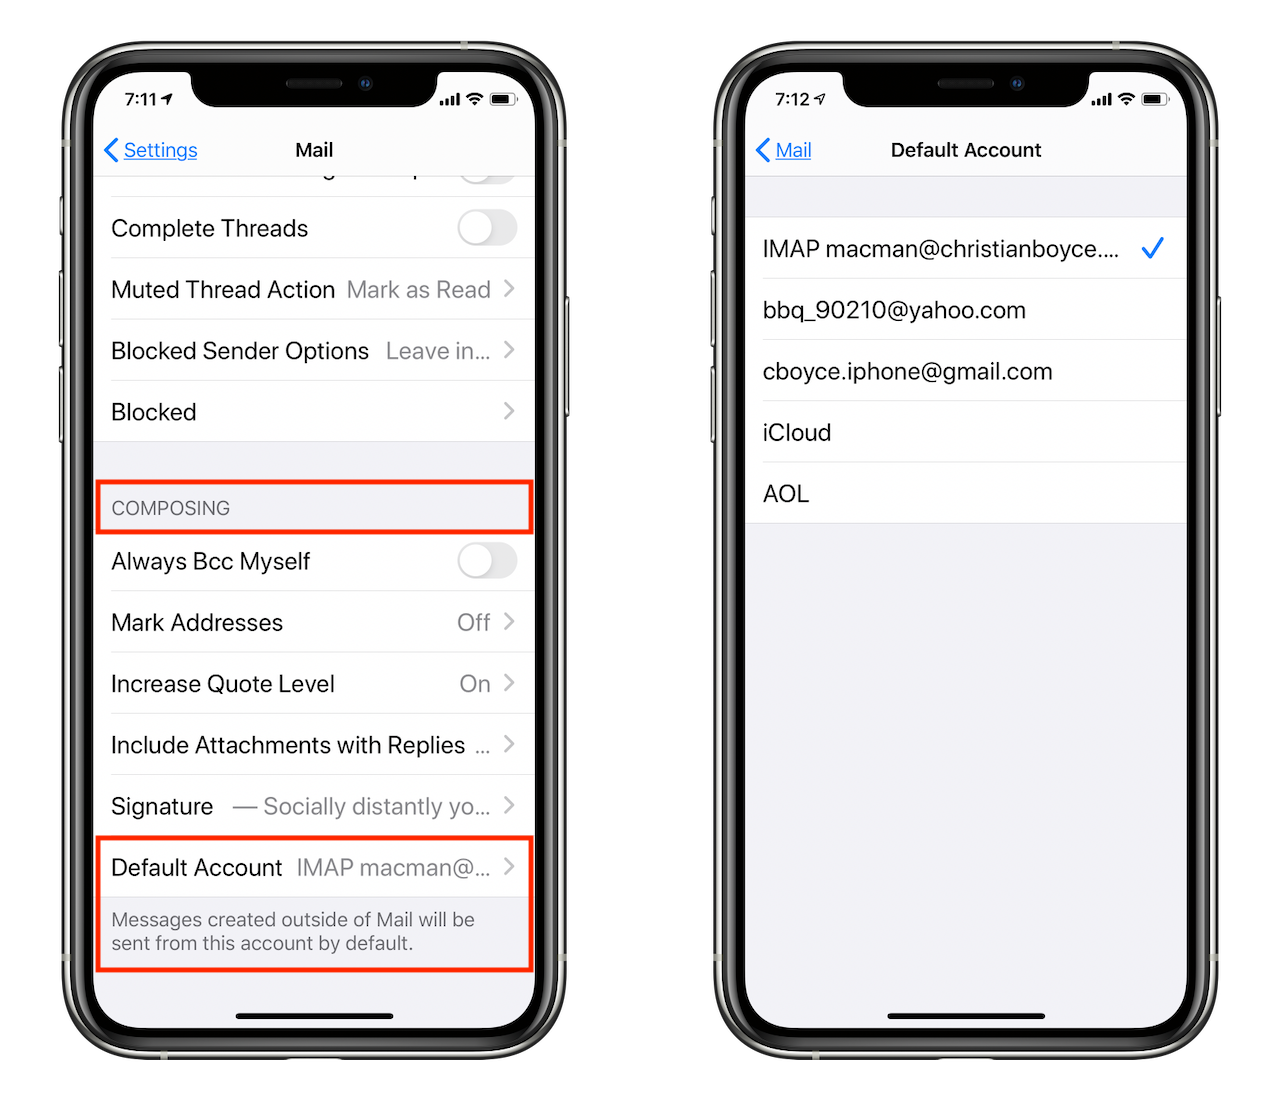
“Created outside of Mail” would be message created by clicking a “mailto:” link on a website (like this one: macman@christianboyce.com) or tapping a button in some other app requesting customer service or support or whatever.
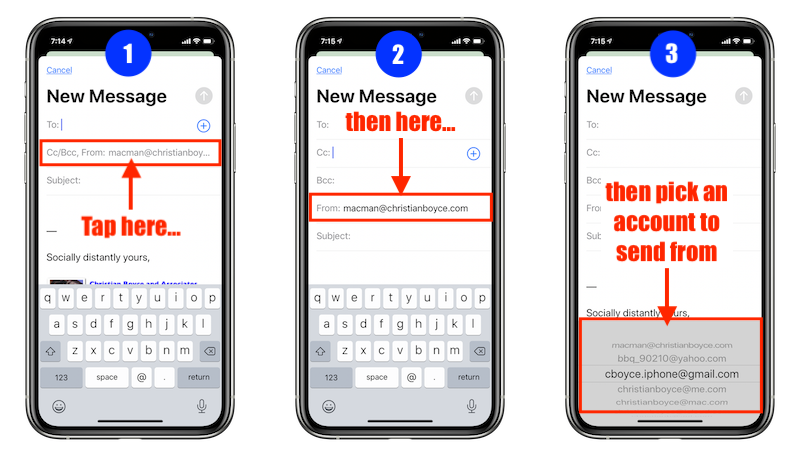
Emails that you create from within the Mail app have their own logic when it comes to which account will be used. Let’s say you have a Gmail account, a Mac.com account, and an AOL.com account. If you’re reading an email that came in on the Gmail account, and you create a new mail message by tapping the New Message button, that message will be set up with your Gmail address as the send-via address. If you’re looking at a message that came in on your .Mac account your new outgoing email will be sent from that account. And so on. It has everything to do with which account the current message came in on. You might think that setting a default account means that every email goes out using that account, but that’s not how it works at all. FYI.
Of course you have the ability to change the account that any given email goes out from– you know that, right? Just tap where it says “Cc/Bcc, From” (revealing the Cc and Bcc feels, and activating the “From” section), and then tap the “From,” and then pick an address to send from by picking something from the list at the bottom of the message.
10. Watch out for Filtering!
Ah, filtering. Personally, I don’t often use it– not on purpose. I point it out here partly because you might like it, and party because if you accidentally turn filtering on, you won’t see all of the mail messages you expect, and that can mess up your day. So let’s learn about filtering in iOS Mail.
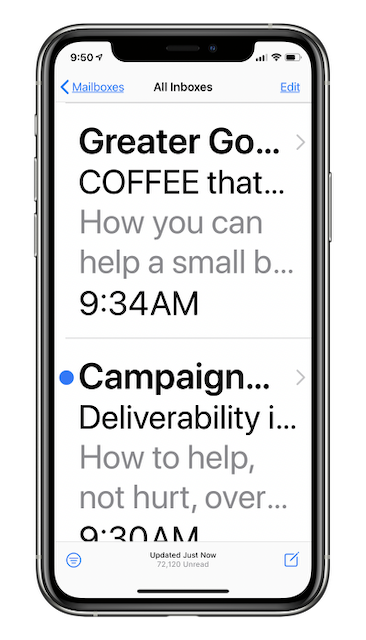
The idea of filtering is you can choose to show only the messages you haven’t read, or only the ones with attachments, or only the ones sent from your VIPs, etc.
Here’s my All Inboxes list of emails, in the normal, default, every-email-showing way, and then next to it the same list, but filtered to only show the unread messages.

The message list became “filtered” when I tapped the little button at the bottom left, below the list. If the button is blue with white lines, it’s active; if it’s white with blue lines, it’s not. Notice in the picture on the right that it shows “Filtered by: Unread” at the bottom. That’s another clue for you, but it’s so small it’s easy to overlook.
If you do turn on filtering you can turn it right back off with another tap of the button. But if you tap where it says “Filtered by: Unread” you get a nice page of options, and one of these days those options might come in handy.

It’s easy to imagine that one day you’ll be looking for an email with an attachment, for example… and you could easily use these Filtering options to say “look in all of my accounts, whether read or unread, and only mail with attachments.”
Note: when they say “Include” it really means “ONLY include.” So… if you were looking for emails with attachments, and you didn’t care whether the email had been read or not, you would NOT check “Unread.” It looks as if you should, but you should not. If you do, you will ONLY see emails that have attachments while also being unread. That probably isn’t what you want. So watch out for that.
Also watch out for the delay between turning a filter on, and the actual filtering to occur. It can take a few seconds. If you turn on filtering to show only Unread messages, for example, you won’t see anything happen immediately. Give it a moment.
When you’re done filtering just tap the filter button again to turn it off.
In Conclusion
iOS Mail is exactly what an app should be: something that anyone can use right away, with additional features and power just a tap or swipe away. It can be used by those who don’t want anything but the basics, and it can also be used by those who want to dive deeper and leverage the power that comes from knowledge.
Hopefully these tips help. If they do, let me know in the comments.
The biggest compliment you can give is to share this article with others. If you found something really good here, please use the sharing buttons for Facebook, Twitter, or LinkedIn.
Copyright 2008-2023 Christian Boyce. All rights reserved.Did this article help you?
Maybe you'd like to contribute to theChristian Boyce coffee fund.

Want some some quick iPhone how-tos?
Visit me at iPhoneinaminute.com.
Looking for quick tips about Macs?
See my One-Minute Macman website!

Please Leave a Comment