
Updated November 6th, 2019.
(First in a series of backup-related blog posts)
Summary
• Buy an external hard drive (here are some good options)
• Connect it to your Mac
• Click “Yes” when asked if you want to use this disk for Time Machine backups
Time Machine is Apple’s backup software. Every new Mac has it, and most old ones do too, as it was introduced with System 10.5 (Leopard). The odds are very very good that your Mac has Time Machine already installed. Time Machine backs up to a disk, not to “the cloud,” so Step One is “get a disk to back up to.” For best results, devote an entire disk to the backup task.
Time Machine will back up every file on every drive you connect to your Mac, automatically, unless you tell it not to. Great stuff.
Time Machine can be used to restore individual files, or an entire Mac. Setting up a new Mac is a piece of cake if you have a Time Machine backup of the old Mac. So is setting up a new hard drive, in case you upgrade your Mac to a bigger, faster disk. By the way,
Once set up, Time Machine works in the background, backing up your Mac every hour. When you need to restore files, Time Machine is ready to restore a single file, an entire folder, your whole Mac– or anything in between. No other backup system is as easy to set up nor as easy to restore from, and if you’re not using it already I’m here to talk you into it.
Keep in mind that Time Machine saves a snapshot of your machine after every backup. Why is that important? Well, imagine this scenario:
- All of a sudden, your Quicken file won’t open. Imagine: your Quicken file opened last week, but it doesn’t today. Maybe it’s corrupted. A “regular” backup system would have backed up the corrupt file– that is, your backup file would be corrupt too. You need to be able to go back a few days and try opening the file as it existed last week. Time Machine lets you do that.
- Here’s another scenario. Suppose you’re working on a project– maybe a report for school, maybe a book, maybe a page layout document, maybe an art project. You make some changes and then, some time later, you realize that the document was better a while back. Time Machine lets you restore older versions of your document– from an hour ago, 6 hours ago, a day ago, 30 days ago, or even last year.
- One more scenario: you open up a folder that used to hold hundreds of photos. But, today, you see just a few. Time Machine lets you go back to the time when tall of the images were where they belonged, and then bring them “back to the future.”
I’m going to assume you’re convinced: Time Machine’s the backup system for you. Now, let’s set it up. Turns out you’re already halfway there, since the Time Machine software comes pre-installed. What you need now is a place for your backed up files to be stored. In most cases, you’ll use an external hard drive for this. Let’s pick one out for you.
Note: Time Machine can only make a backup when the disk is connected. So, once we set things up, you should keep the disk connected. If you’re a laptop user and you can’t keep the disk connected when you’re moving the machine around just remember to re-connect the disk again as soon as you can. Time Machine is smart and will recognize the disk when it’s there, and the backups will start up again within an hour, without you doing anything else.
First thing to do is figure out how big a disk you need to get. Look under the Apple menu for “About this Mac.” Click the “Storage” button. It’s going to look something like this:

(There are other ways to find out how much storage you’re using– you can use the Disk Utility app, you can use the System Information app, you can Get Info on the hard disk– you can even email me and I’ll help you do it.). Those with more than one hard drive should add up the total space used.
Get a hard drive that is about twice as big as the amount of space you’re using now. I should get a 2 TB disk. Now the question boils down to “which disk do I get.” I can help you there too.
Note: don’t go cheap here by reusing some old disk you have sitting around. Backups are important! Don’t take chances. Get a new disk and dedicate it to backups. This is 30 years of experience talking.
You’ll need a disk that can connect to your Mac. In almost all cases, this means a drive that connects via USB. If you have a really new MacBook or MacBook Pro (the kind with USB-C ports and nothing else), you need something with a USB-C connector, or else you need one of Apple’s USB-C to USB adapters.
You can find external USB hard drives at Apple stores, at Best Buy, at Staples, etc. Here’s a link to the external hard drive section at MacSales.com. Call them if you’re not sure which disk to buy!
If you’re willing to spend a little more, get a solid state drive (SSD). SSDs have several advantages compared to old-style spinning hard drives:
- They’re faster
- They’re smaller
- They’re lighter
- They draw less power
- They’re quieter
- They’re cooler
You might wonder why “faster” is important. Speed factors in three ways: one, when you’re just trying to get that first backup done, two, when you’re restoring items from Time Machine, and three, when you are using the Time Machine backup to transfer stuff to a new Mac.

Affordable, external SSDs are fairly new (it’s the “affordable” part that’s new). Samsung makes some really good ones and you can find them at Amazon. The Samsung T5 is the one I use and like. In addition to being fast (Samsung says 4.9 times faster than regular, spinning external disks) the Samsung T5 includes regular USB and USB-C cables.
You’ve done the hard part– you bought a disk. Now connect it to your Mac. Assuming it’s a new disk, and assuming you haven’t set up Time Machine on your Mac previously, you’re going to get a dialog box with three choices:
- Use as Backup Disk
- Don’t Use
- Decide Later

More than likely, if you got this far down the page, you’re going to choose “Use as Backup Disk.” If you’re not sure, click “Decide Later” and the Mac will ask you again, next time you connect the disk to the Mac. “Don’t Use” means “don’t use,” and you won’t be asked about using that disk for backups again.
About that Encrypt Backup Disk checkbox: for some people, checking the box is the right thing to do. What it does is lock the information that’s on the backup disk, protecting you from someone walking away with it and getting into your stuff. Sounds like a good idea, but there’s a password involved, and if you forget the password, you’re sunk. You won’t be able to access the files on that backup disk without the password. In my experience, encrypting the backup leads to extra stress and confusion when trying to use the Time Machine backup to restore files, because it’s one of those passwords that isn’t required very often, so people forget that there even is one. Being locked out of your backup disk is a very bad thing, so I don’t advise encrypting the backup disk. Remember, your information isn’t flying across the internet, where it’s easy to steal. It’s going from your Mac, through a cable, to a backup disk on your desk. Unless you think someone is going to take that backup disk off your desk, I would not encrypt it.
[Google_Responsive_Ad1]
If you saw the dialog box and clicked “Use as Backup Disk” the backup will begin in 120 seconds. If you go to System Preferences/Time Machine you can watch the progress. If you check “Show Time Machine in menu bar” you can keep an eye on things without opening System Preferences. See below: same info, presented different ways.
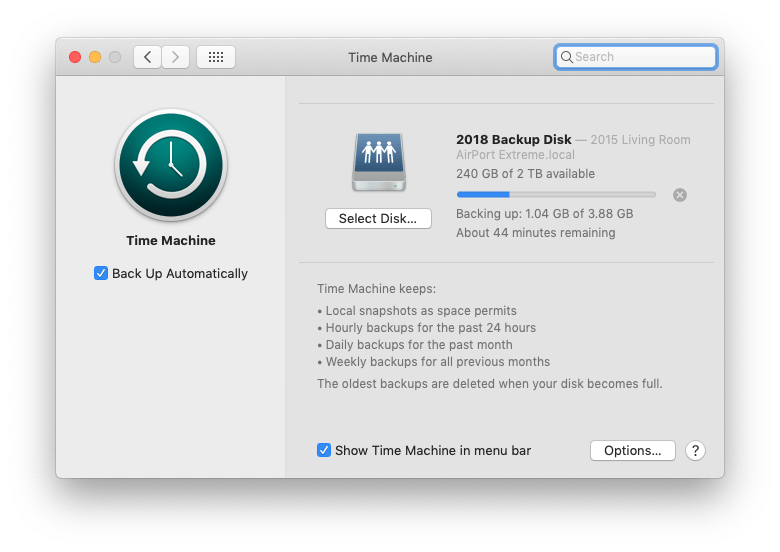

When Time Machine is working you’ll see the second arrow head in the menu bar’s icon, like so:
What do to if Time Machine does not recognize your disk, and does not ask you whether you want to use it as a Time Machine backup disk
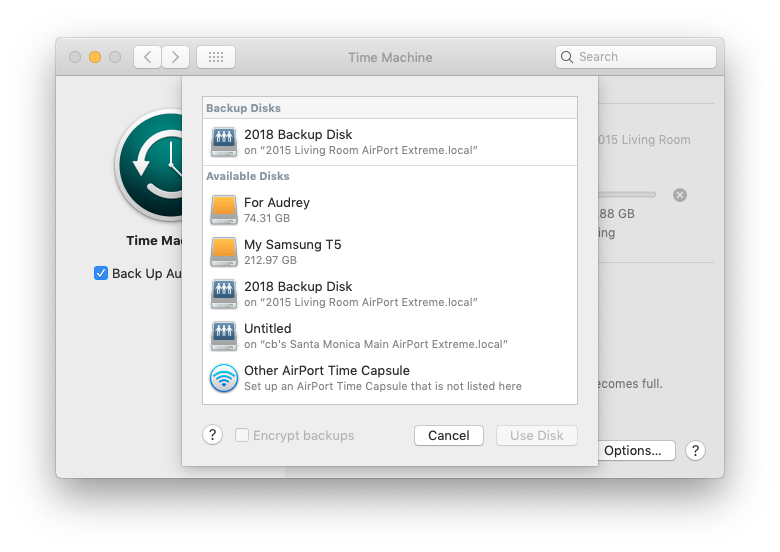
It might turn out that the Mac doesn’t put up the box asking about using your new disk for Time Machine. That’s OK– we can set things up by hand and they’ll work just as well. All you have to do is click the “Choose Disk…” button in the Time Machine preferences.
Note: don’t click “Enter Time Machine.” That’s what we do when we want to restore files. I’ll cover that in another article.

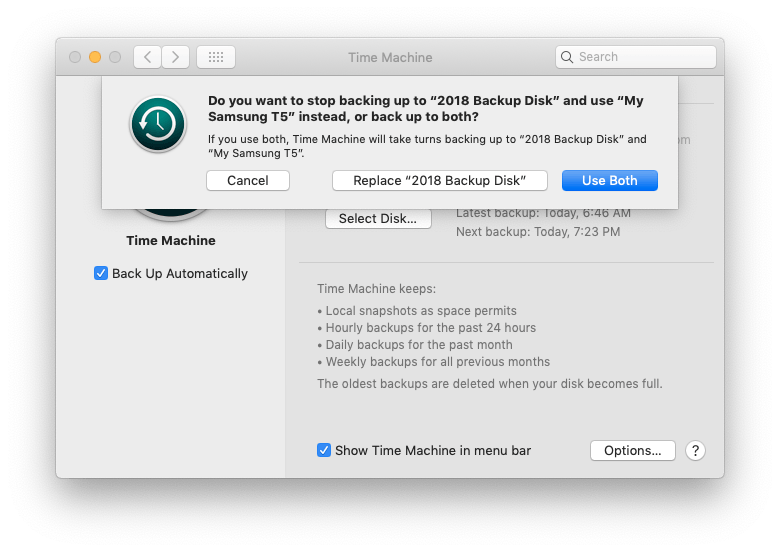
If you aren’t sure what to do, click “Cancel.” If you want this new disk to be “the” backup disk (maybe you lost the old one, or maybe the old one failed), choose the “Replace” option. If you want to keep both disks connected, and have the Mac take turns backing up to one and then the other, choose “Use Both.”
Note: Use Both sounds good but unless you are going to keep both disks connected at all times you are going to get a lot of errors saying “Can’t back up to disk so-and-so” when it’s not connected.
So, how do we know it’s backing up? Well, we either look in the System Preferences/Time Machine to check, or (easier) we click the icon in the menu bar and see what’s what. Remember, Time Machine backs up every hour, so if your disk is connected, and you click the Time Machine menu bar icon, you should either see that it’s backing up right then, or “cleaning up,” or “preparing backup.” You won’t see anything unless you click the icon, so click. If Time Machine is not busy it will show you the time of the most recent backup. It had better be sometime within the last hour, because Time Machine is supposed to back up every hour.
One more thing: as mentioned above, Time Machine backs up every disk connected to your Mac. At least it does by default. If you have disks that you DON’T want Time Machine to back up, click the Options button in the Time Machine preferences, and exclude what you want to exclude,
What can go wrong
Sometimes you look at the Time Machine menu and you see the last backup was a year ago. Ooopsy! You haven’t been backing up. The drive might have failed, or it might not be connected (laptop owners, I’m talking to you), or maybe the checkbox in the Time Machine preferences, the one that says “Back Up Automatically” is unchecked.
Also, this doesn’t qualify as something “going wrong” but it’s still a thing: some day, your backup disk is going to be full. At that point, you either get a new disk (and you know how to set it up to be the new backup disk), or you let Time Machine delete older “snapshots” of your Mac. That’s no big deal– you’re still backed up. But, if you had a bunch of stuff in the trash the first day you used Time Machine, and then some time after the first backup you emptied the trash, you wouldn’t be able to go to to when the stuff was in the trash anymore. The Mac had a snapshot of that day, but eventually the system has to create space, so it throws out the old snapshots as needed.
Questions and Answers
Q: How long does a backup take? A: The initial backup will take a long time, at least a few hours. But subsequent backups– which will occur automatically on an hourly basis (this is why you keep the disk connected)– only need to backup up what’s changed since the previous backup. Most things DON’T change (fonts, system files, applications, many documents, most music and images) so these hourly backups don’t take long.
Q: Does Time Machine slow my Mac down? A: A little. A tiny bit. But not very much. If you’re doing video editing or music editing or otherwise taxing the Mac’s horsepower, use Time Machine’s menu bar icon to “skip this backup” to buy yourself an hour of non-Time Machine time. Otherwise, don’t worry about it— you will probably not notice the backup when it runs.
Q: Can I work while Time Machine is backing up? A: Yes. In fact, other than the initial backup, you will probably not even notice that Time Machine is doing anything.
Q: I thought everything was backed up to iCloud. No? A: No. Your iPhone and iPad get backed up to iCloud. But your Mac does not. Of course some of your stuff might be present in iCloud: mail, photos, contacts, calendars (among other things) but that doesn’t mean it’s “backed up” and especially it doesn’t mean you can go back to how things were a day ago, or a week ago, or a month ago. All iCloud is going to do is have a copy of your current stuff. You still need your own Time Machine backup.
Q: How do I know Time Machine is running? A: See my one-minute article about that.
Q: How do I know that Time Machine is working? A: See my one-minute article about that.
Q: How do I use Time Machine to get stuff back? A: That’s coming in another article. I can only write so fast.
Copyright 2008-2023 Christian Boyce. All rights reserved.Did this article help you?
Maybe you'd like to contribute to theChristian Boyce coffee fund.

Want some some quick iPhone how-tos?
Visit me at iPhoneinaminute.com.
Looking for quick tips about Macs?
See my One-Minute Macman website!

Great article 🙂
It might also be worth mentioning the following:
1) Time Machine can backup via your home wifi network to a suitable wifi drive (e.g. Apple Time Capsule). This is really convenient, but can be expensive.
2) You can connect more than one drive and Time Machine will alternate between them. Obviously this adds to the expense, but does give peace of mind as a drive might fail at some point in the future.
Howdy Nigel–
Good points, both. The first point was a better option when Apple was still making the Time Capsule. Even the Apple Airport was a good candidate for connecting a drive to. If you have an Apple Airport already this is a good option and I think I will add this to the article.
The second point is so good I mentioned it in the article. 😃