
Updated April 13th, 2020.
As promised, here’s how to make your Mac read out loud to you. It’s very handy.
Note: here’s a link to my article about making your iPhone and iPad read out loud.
Let’s start with Mail.
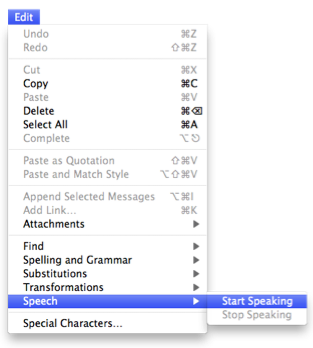
Mail will read out loud any selected text. So, if you get a long email, click in the body of it, do a Select All (or Command-A), and then go to Edit/Speech/Start Speaking. Very easy.
Now, let’s look at Safari.
Safari will also read out loud any selected text. It’s exactly the same as Mail: Edit/Speech/Start Speaking. If you use Safari’s “Reader” feature, you’ll have an easier time selecting the text you want. Reader hides “web junk” and leaves you with nothing but the article. Here’s an example.
First, here’s a web page. There’s a story in there but there’s a lot of other junk there too. It’s a little distracting. And, it prevents you from selecting just the story when you do a Select All because all of the other stuff gets selected too.

This is what Reader’s for. It turns a web page like the one above into a web page like the one below.

Nice and neat! No distractions! Plus, if you do Command-A here, you’ll get just the story.
Swtich to “Reader” mode by clicking the gray Reader button in the address bar. Here’s what it looks like:

Click it again to make Reader go away. (Reader is worth knowing about even if you’re not going to have the page read to you out loud. Use it any time you want to hide a web page’s clutter and focus on the story. The button disappears if Safari doesn’t think it can figure out what the story is.)
Not all programs can read out loud the way Mail and Safari can, and of the ones the can, not all do it via Edit/Speech/Start Speaking. Some programs require you to select the text, then control-click on it to reveal a “Speech/Start Speaking” pop-up menu item. You may need to experiment with this a bit but it’s worth it. Pages is one such program. Very handy, by the way, to have your writing read back to you.
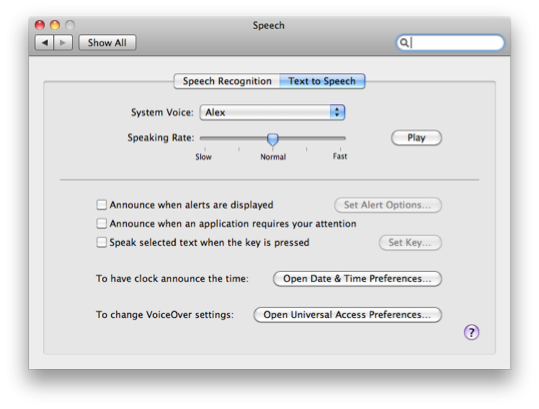
Finally, let’s have a look at the voice itself, and how you can control it. The voices on the Mac are far better, and far more configurable, than the ones on the iPhone and iPad. The way you do it is you go to the Apple menu, then to System Preferences, then to Speech. In the Speech section, switch to the Text to Speech section and you’ll be given the option to chance voices. Try the various voices, and try adjusting the rate to hear how things sound. You can click the Play button to hear a sample sentence. I like Alex at the normal rate, FYI.
There are a few shortcomings (you can’t choose the voice, you can’t do Select All in iBooks or Safari, and you can’t trigger it from Siri), but even so, Speak Selection is worth exploring.
Copyright 2008-2023 Christian Boyce. All rights reserved.
Did this article help you?
Maybe you'd like to contribute to theChristian Boyce coffee fund.

Want some some quick iPhone how-tos?
Visit me at iPhoneinaminute.com.
Looking for quick tips about Macs?
See my One-Minute Macman website!

Please Leave a Comment