Updated December 13th, 2015.
(First in a series.)
A couple of weeks ago Mom was asking me how to make things bigger on her Mac. Naturally I had her select Displays from the System Preferences (under the Apple), and in there I had her choose any size that WASN’T the one with the largest numbers. Just as naturally, Mom didn’t like the way things looked, as there’s only one “sharp” resolution on an LCD screen, and that’s the one with the largest numbers. Yes, things were bigger, but no, they weren’t better. Try again, she said.
(Isn’t it funny how a person who wants things larger because the small type is too hard to see has no problem at all discerning the slight fuzziness present at larger sizes? Remarkable.)
If blowing up the entire screen (and losing quality in the process) wasn’t going good enough I was going to have to do it the hard way. Which is to say, go program by program and set the preferences in each to make things bigger. Today we’ll learn about doing that in Safari. We’ll cover Mail, the Finder, and a bunch of other programs later.
Safari 3 lets you make a website’s text larger (or smaller) in a couple of ways. First, you can go to the View menu and choose “Make Text Bigger” (or “Make Text Smaller”).
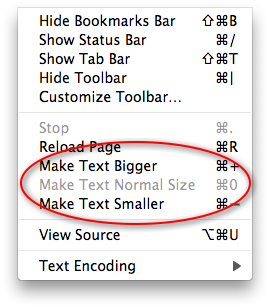
Another way to do it is to use the keyboard shortcuts next to the menu items for Make Text Bigger and Make Text Smaller: Command-Plus and Command-Minus. You don’t have to use the Shift key to do it– just tap the + or the– while holding the Command key.
A third way is to click the “Big A” and “Small A” buttons on the toolbar. What, your toolbar doesn’t have those buttons? Solve that problem by going to Safari’s View menu and choosing Customize Toolbar…
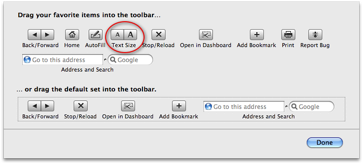
Drag the two “Text Size” buttons up and onto the Toolbar, wherever they’re handy for you. When you’re done, click “Done,” and from then on all you have to do is click the big A to make the text bigger, and the small A to make the text smaller.
(Note to Safari 4 users: it works almost exactly the same way for you, except you’ll increase/decrease the size of the pictures as well as the text.)
Of the methods presented so far, I like Command-Plus and Command-Minus. But here’s another method that’s even better. At least sometimes.
Go to Safari’s Preferences (under the Safari menu) and click the Appearance button.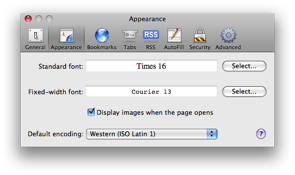
Jot down the information already in the box (Times 16 and Courier 13)– you might want to change back to original settings one day– then click each “Select…” button in turn and choose a larger size using the slider on the right. Don’t go crazy with it, and remember that you won’t see a change in every website (though you will on this one). Slide things around until it’s easy to read, and from then on your websites will load in the larger font. At least some of them will.
Cool stuff, eh?
Copyright 2008-2023 Christian Boyce. All rights reserved.
Did this article help you?
Maybe you'd like to contribute to theChristian Boyce coffee fund.

Want some some quick iPhone how-tos?
Visit me at iPhoneinaminute.com.
Looking for quick tips about Macs?
See my One-Minute Macman website!

Please Leave a Comment